Thursday, April 2, 2015

New Quilting Space in the Works - Part 1

I made my wonderful husband very nervous. I didn't mean to do it at all but it sure is funny.

Last year, right around this time, I took a long arm course with Judy Madsen from Green Fairy Quilts. I had already taken two courses in the months prior. The first course taught me the basics of the machine and how to panto a quilt. The next one taught me to free motion quilt on the long arm. Prior to this I was a topper. I enjoyed making the quilt tops but HATED quilting them on my domestic machine. After these two courses I was hooked on long arming.

Mom came up and stayed here for a couple of days for me so that I could take the more intensive course from Judy. The two introductory ones I was able to start and finish while the kids were in school but this one was two full days and I wasn't able to get home for picking up the kids. I really only got home in time to see my younger one for half an hour before it was her bedtime. I loved the course though and got pricing and the specs on getting my own machine.

By then I already had Trinity Quilts incorporated by a lawyer and we could look at moving forward to getting TQ actually established as a business and Quinn was all for it. Then he saw the measurements of a long arm (and the price) and although he was still all for it, he knew we had to do some thinking on how to manage it.

The long arm I want is one of the APQS systems called the Millennium. And it is 14 feet long. We got to thinking how we could manage it since it is the most use to me if it is in the house because I have childcare to consider and it is much more limiting if it is located elsewhere. Quinn came up with a GREAT idea. We would take out the back wall of my quilting room and extend my room into the family room behind it and make that room much smaller since the other half of the family room doesn't really get used anyway. The kids aren't jumping for joy about it since all they see is that their playroom is getting cut in half but I they will live.

The bullet points of where things are at now and what has occurred recently to get us to the rest of the story:

  • Almost a year later and the wall is still in place.
  • The kids are off school for Spring Break and I can't really sew because of that.
  • We were at Home Depot for something two weekends ago now and I saw an organization type magazine with sewing room ideas on the cover that we bought.
  • It gave me a great idea for a peg board so we went to Home Depot this weekend to get one.
  • Weird for us, we couldn't find the paint chip for the room which we needed to paint the pegboard.
  • While there, I figured we would get the pink board to make a solid design wall since the one Quinn tried so hard on wasn't working for me.
  • In order to paint match, I now had to cut a chunk out of the wall to take to Home Depot.
  • The place I had to install the design wall for now isn't where I want it when the room is complete but where I want it to go is the wall that hasn't been built yet.

Does anyone else see where all this is going?

On Monday, since I couldn't sew, I started doing measurements and the math for putting up the wall. I only went as far as putting up the stud wall and drywalling the kids side of the wall. I was almost done when Quinn phoned just as a mid-day check in while having lunch with his client (and someone we have known for quite a while). So I asked him if you have to put in double studs at the ends of walls for confirmation of whether I had done things right.

Well, apparently the colour drained from my poor man's face (according to his client who ended up nearly splitting himself laughing so hard). He thought that I had already done the demolition on the wall and had the stud wall partially built. Considering he left at about 7:30 am and it was only about noon, apparently I had been really busy since we haven't bought any of the materials either.

So, I reassured him that the only tool of his that I had used was a tape measure and that the sharpest tools I had used was a pencil unless you count a needle and scissors since I had done some hand stitching and that the walls looked no different than when he left that morning. He felt much better after that.

Many of the people that he works with have joked that I must be a patient woman and I am very much a go with the flow kind of person who loves her husband with all that I am and wouldn't have my life any other way. With all of that, Quinn knows when to just give in gracefully and do what I want since I don't push that hard most of the time and when it gets to the point of me basically drawing up blueprints, he knows that it is time to get it done.

So, our Easter is pretty secular and because it is Easter weekend in a couple of days, he has four days off in a row.

Can anyone guess what we will be doing?

This is the first corner of my quilting room as is it right now:


The blue on the walls is the paint we were looking for the chip for. When it was painted that colour, I was aiming for the colour of the Caribbean Ocean. There aren't any windows in this room at the moment so I was looking for something bright and cheerful. The next corner is:


The plan with the pegboard was to paint it the same blue as the walls so that it blended in nicely. The corkboard/whiteboard combination was going to come down and go somewhere else and the pegboard was going in landscape style, the top butted up against that ledge thing at the ceiling and coming down the full four feet and going from the corner behind the TV to the corner where I have the shelving (seen in the first photo). The big board on the right wall is a big ironing board when it is flipped down. It is hinged on the bottom edge and clips up out of the way with big "I" bolts and carbiners. It covers the whole of my cutting table and is great when ironing large pieces of fabric or quilt tops.


The corner here shows where I set my regular ironing board up. When I am cutting a bit, ironing a bit like I have been for my sampler, this board works much better since I have to have the cutting table clear to use the big board. You can also see the edge of my design wall. Quinn tried really hard to make me a retractable design wall. He got a projector screen, took off the screen and installed a large flannel sheet where the screen used to be. Unfortunately it keeps warping weird and without a solid backing, things don't stay on it very well. It was a really good idea but it just didn't work the way we had hoped.


This is the last corner. The wall where the window is and the design wall hangs is the wall we want to remove altogether. The window is not a window to the outside. It is just a window  of frosted glass to the family room on the other side. You can also see the fabric laid out for the sampler we are working on.


These are the double doors with a shelf over top that we installed. I currently have a hundred year old sewing box that was my great-great-great-grandmother's (I think I have the right number of greats in there). I also have the blocks for two HST UFOs. They will eventually be two twin sized quilts but I only recently figured out what I was going to do for sashing since I didn't have as much fabric as I needed for my original plan.


This is the other side of the wall where the design wall hangs. You can see the little frosted window that I mentioned that shows through to the family room. The wall will be extended from the corner between the bookshelf and the couch. The inside of this new wall is where I want the new design wall to be installed.


I will acquire most of this space. The TV will be moved from here and a new cable outlet will be installed in the opposite corner of this space. The kids will lose about a third of the room which is super long but really they only use this space and they will have the same effective space, just at the other end of the room instead.

So, that is where we are for the moment. We will be getting supplies and things and getting going on the weekend. The TV will be moved for the kids first and then the demolition of the wall. With it being the long weekend, we have to watch when the EcoStation is open so that we can get rid of the garbage. That is the plan for now and I am looking forward to posting pictures along the way. Watch for part 2 but there will be more parts than that.

Tara

Friday, March 27, 2015

Agri-Spouse Friday - Week 34

Welcome back to our Quilt Along.

Next week is Spring Break here so I have the kids home all week. I know that I won't get any sewing done but I already have the blocks for next Friday pieced so I know that I am good for next week. 

Look what I got!

Quinn first went to my LQS, Earthly Goods, on the 23rd of December to get this for me but they were closed so he came home and ordered it online direct from the Oliso web site. We don't like to shop at all Boxing Day week so he figured that this would get me the iron more quickly.

When it wasn't here in a couple of weeks we called and they said it was backordered and would be here by the 23rd of January. When it wasn't here a couple of weeks after that date we called again and they said that there were problems at the factory and that it would be here in a couple of weeks. It still didn't show so a week after that date we called and they said that it was in the shipping containers on the west coast and it would just be a couple of weeks more. Once again we waited but it still didn't come. I called my LQS and they had one in stock so I called again and they gave me the same story about it being in the shipping containers on the west coast so I cancelled the order. At this point it had been almost three months since he ordered it and I was sick of their excuses.

Unfortunately, I had read all of the reviews of all sorts of different quilting irons while I waited and this was still the best fit for me so even though a part of me wanted to buy a different iron, a bigger part of me still wanted this one so I went to my LQS and bought it. 

I do love it though. It is taking some getting used to since I have been ironing with a traditional iron for thirty years but I love my new iron. I love my wonderful husband and although he feels terrible that I had to wait for three months for my iron, I'm okay with it because he tried to do something so sweet and wonderful and I love him so much for it.

We have been having a lovely spring thaw and we have been loving it. All of us here have had quite enough of winter. We actually got to get the bikes down from the garage ceiling a few weeks ago. Of course I knew it was too good to be true enough to last and we got a big snowstorm last week. We shovelled, cleaned it up and things are melting again. The kids got to ride their bike again yesterday. I am quite sure that they will get lots of bike riding done next week while they are off school.

Otherwise I have some lovely photos from Suzanne. First we have End of Day:


And then we have another End of Day:


We have Darting Birds:


And Country Path:


Then Morning:


And last but not least, Corn and Beans:


I love these blocks. 

This week we will start with Block #43 - Garden Path.

Cut two 1 1/2" x 1 1/2" purple squares.
Cut two 1 1/2" x 1 1/2" blue squares.
Cut two 1 1/2" x 1 1/2" green squares.
Cut two 1 1/2" x 1 1/2" orange squares.
Cut four 2" x 2" grey squares.
Cut one 2" x 2" purple square.
Cut one 2" x 2" blue square.
Cut one 2" x 2" green square.
Cut one 2" x 2" orange square.
Cut six 1 7/8" x 1 7/8" grey squares. Cut these on the diagonal.
Cut two 2 1/2" x 2 1/2" grey squares. Cut these on the diagonal.
Cut two 1 1/4" x 3 3/8" red rectangles.
Cut two 1 1/4" x 4 3/4" red rectangles.


Sew one of each of the 1 1/2" squares into a four patch.

Match one 2" grey square with each of the 2" coloured squares. Make these into HSTs and trim to 1 1/2" x 1 1/2".

Organize your pieces the way you want them to look.


Place one small square RST with an HST. Sew a 1/4" seam, set the seam and press to one side. Repeat with the other three small squares.

Place one small grey triangle RST with an HST with the corners matching. Sew a 1/4" seam, set the seam and press to one side. Repeat with the other three HSTs

Centre the long edge of one of the large grey triangles along the edge of the four patch you pieced. Sew a 1/4" seam, set the seam and press to one side. Repeat with another large grey triangle on the opposite side of the four patch.


Centre the large side of another large grey triangle RST with the four patch.Sew a 1/4" seam, set the seam and press to one side. Repeat with the last large grey triangle on the last remaining side of the four patch.

Place one small grey triangle RST with the corners matching with the HST of the square/HST set. Sew a 1/4" seam, set the seam and press to one side. Repeat for the other three square/HST sets.

Place one small grey triangle RST with the corners matching with the triangle/HST set. Sew a 1/4" seam, set the seam and press to one side. Repeat with the other three triangle/HST sets.


Place the square/HST/triangle set RST with the triangle/HST/triangle set with the corners matching. Sew a 1/4" seam, set the seam and press to one side. Repeat for the other three sets.

Place one small red rectangle RST with the edge of the centre piece. Sew a 1/4" seam, set the seam and press to one side. Repeat with the other small red triangle on the opposite side of the centre piece.


Place the large red rectangle RST on a remaining side of the centre piece. Sew a 1/4" seam, set the seam and press to one side. Repeat with the last large red rectangle on the last side of the centre piece.


Place one of the pieced triangles RST with the edge of the red rectangles. Sew a 1/4" seam, set the seam and press to one side. Repeat with another of the pieced triangles on the opposite side of the centre piece. Sew a 1/4" seam, set the seam and press to one side.

Place another of the pieced triangles RST on a remaining side of the centre piece. Sew a 1/4" seam, set the seam and press to one side. Repeat with the last pieced triangle on the last side of the centre piece and the first block for this week is complete!


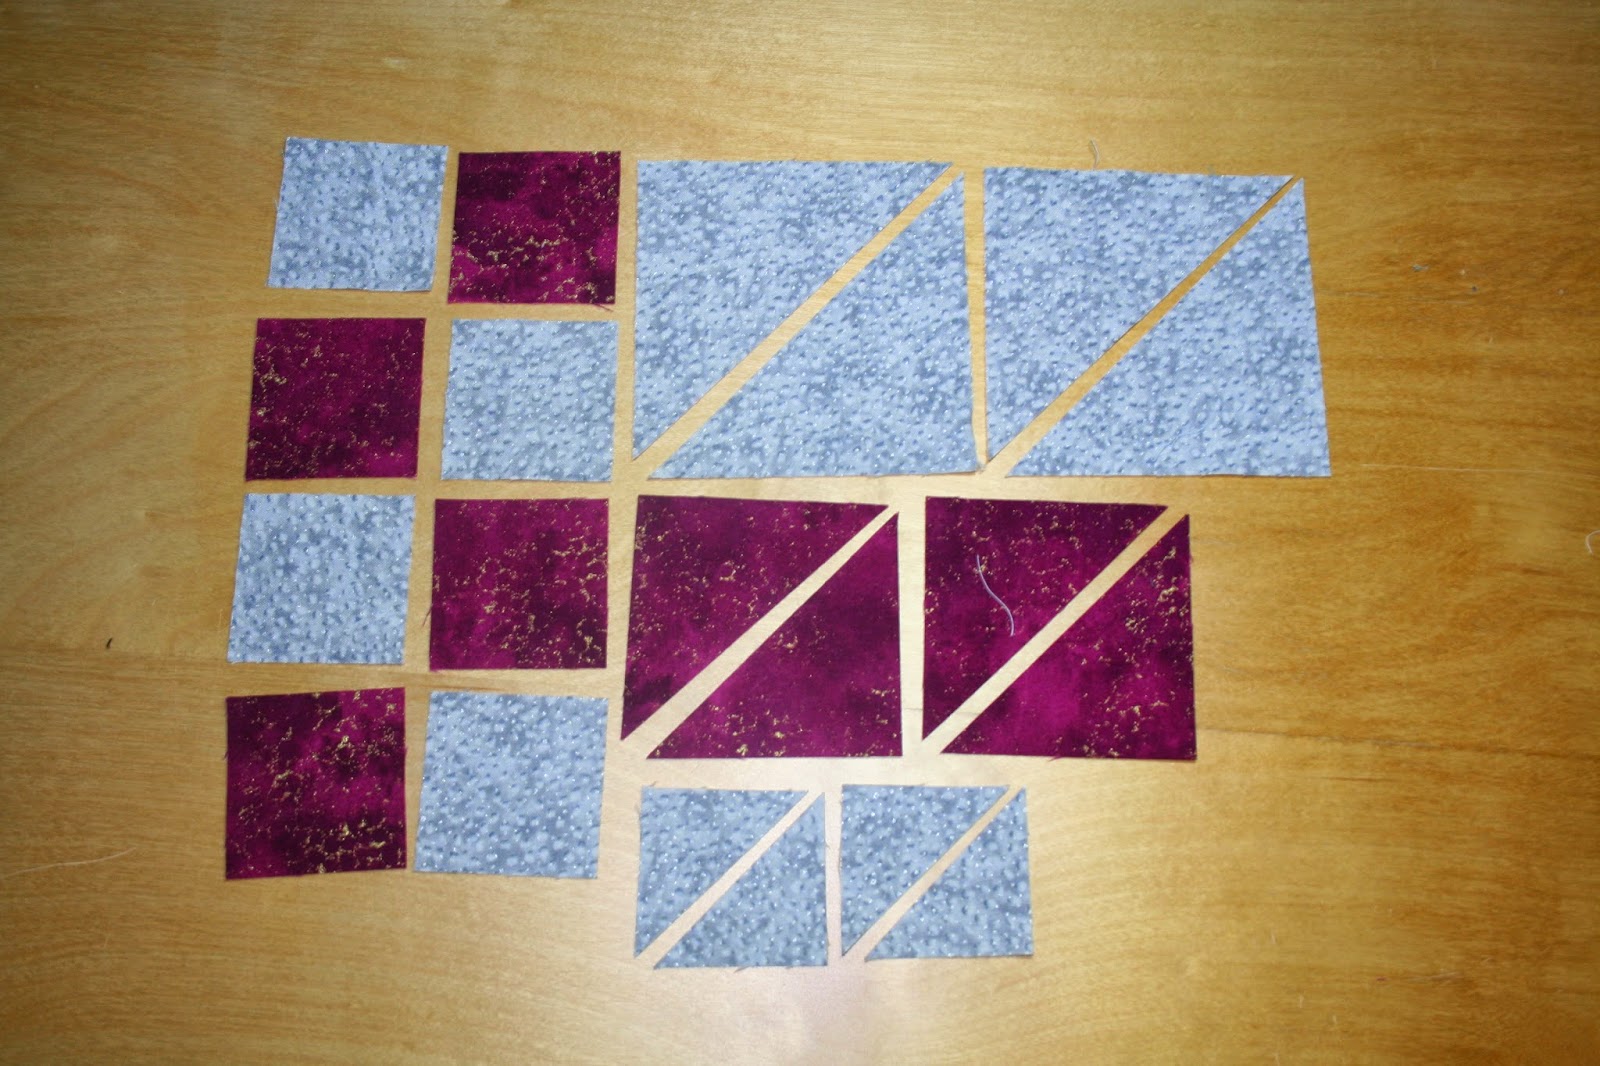
The second block for this week is Block #75 - Rosebud.

Cut two 3 7/8" x 3 7/8" grey squares. Cut these on the diagonal.
Cut four 2" x 2" grey squares.
Cut four 2" x 2" raspberry squares.
Cut two 2 7/8" x 2 7/8" raspberry squares. Cut these on the diagonal.
Cut two 1 7/8" x 1 7/8" grey squares. Cut these on the diagonal.


Match each of the grey squares RST with a raspberry square and make them into HSTs.

Organize the pieces the way you want them to look.


Place one of the HST RST with another HST. Sew a 1/4" seam, set the seam and press to one side. Repeat with the other HSTs.


Place a small grey triangle RST with the HST pair with the corners matching. Sew a 1/4" seam, set the seam and press to one side. Repeat with the other three small grey triangles and the other three HST pairs.


Place the large raspberry triangle RST with the HST strip with the corners matching. Sew a 1/4" seam, set the seam and press to one side. Repeat with the other three raspberry triangles and HST strips.


Place the long edge of the large grey triangle RST with the long edge of the triangle you pieced. Sew a 1/4" seam, set the seam and press to one side. Repeat with the other large grey triangles and the triangles you pieced.


You now have a basic four patch to put together. Place two squares RST and sew a 1/4" seam, set the seam and press to one side. Repeat with the other two squares.

Place the two large rectangles RST with each other. Sew a 1/4" seam, set the seam and press to one side and the second block for this week is finished.


Our third block wasn't originally on the schedule for this week. It was a block that we didn't do on week nine and then I kind of forgot about. With the difficulty of the blocks we are working on now, this block should be super quick.

With that, the third block for this week is Block #107 - Windblown Square.

Cut eight 2 1/2" x 2 1/2" purple squares.
Cut four 2 1/2" x 2 1/2" green squares.


Place each of the purple squares RST with either a red or a green squares. Make all of these into HSTs. Trim each HST to 2" x 2".

Organize your pieces the way you want them to look.


Place the HSTs RST into pairs. Sew a 1/4" seam, set the seam and press to one side.


We are now going to make the HST pairs into four patches. Place the pairs RST, sew a 1/4" seam, set the seam and press to one side.


Place two of the four patches RST, sew a 1/4" seam, set the seam and press to one side. Repeat for the other four patch pair.


Lastly, place the two pieced rectangles RST. Sew a 1/4" seam, set the seam and press to one side and the third block for this week is finished!


With that, we'll see how Spring Break goes next week and how we all survive! Spring Break is so much fun and we are so looking forward to the spring weather but the kids get bored with a whole week at home and I get no machine sewing done.

So, have fun and I'll see you next week!

Tara.


Friday, March 20, 2015

Agri-Spouse Friday - Week 32 and Week 33

Welcome back to our Agri-Spouse Quilt Along.

Sorry I didn't post last week after getting all caught up the week before. I got all the sewing done but then when I went to write up the post, my computer wouldn't connect to the internet. Quinn was out of time and there just wasn't the time after he did get home until late Sunday for him to take a look at my computer. He got it fixed but then with the kids in school during the week, I used that time to sew instead and will do four blocks this week.

I do have blocks to share though. From Mom I have Old Windmill:


And Four Winds:


And Postage Stamp:


From Marion we have Jackknife:


And Birds in the Air:


And Hovering Hawks:


Then End of Day:


And Corn and Beans:


Marion was able to do Corn and Beans with the seams only where they were supposed to be. I was very interested to see if Marion and Suzanne would be able to do it even though I wasn't. We are getting into the more difficult blocks now and I have to admit that some of these I am thinking might be easier with foundation piecing. I would be interested to hear if anyone would object to doing some of these blocks with foundation piecing instead. 

I am pretty sure that Marion and Suzanne know how to foundation piece but I know that Mom doesn't. Maybe Suzanne could show her what to do at one of the quilting days that they both attend? I have to admit that there are a few that I don't know how I am going to manage without foundation piecing. I have been quite worried about some of them. The last seven blocks have had me quite nervous. I don't even have them planned out on my EQ7 quilt. The very last one of all has a "Y" seam which I have never done.

With that, I will look forward to hearing from you and we will get on with the instructions for the next four blocks.

The first block for week 32 is Block #79 - Silver Lane.

Cut two 2" x 2" green squares.
Cut two 2" x 2" yellow squares.
Cut four 1 1/2" x 2 1/2" red rectangles.
Cut twelve 1 1/2" x 1 1/2" green squares.
Cut four 1 1/2" x 1 1/2" yellow squares.
Cut four 1 1/2" x 2 1/2" yellow rectangles.
Cut eight 1 1/2" x 3" blue rectangles.


Place a 2" yellow square and a 2" green square RST and make HSTs with them. Repeat for the other 2" yellow square and 2" green square.

Take the yellow rectangle and place the blue rectangle RST on the end at right angles. Draw a line diagonally as if the blue rectangles were just a square. Sew directly on the line. Trim the little triangle off the end a 1/4" from your stitch line. Set the seam and press to one side. Repeat for the other three yellow rectangles. Now place a blue rectangle RST on right angles on the other end of the yellow rectangle. Draw a line diagonally as if the blue rectangles were just a square. Sew directly on the line.  Set the seam and press to one side. Repeat for the other three yellow rectangles. You should now have four "extended" yellow/blue flying geese.


Sew together the four yellow/green HSTs like a four patch.

Trim your flying geese to 1 1/2" x 4 1/2". Place a green square RST on the end of the flying goose. Draw a line diagonally on the square and sew directly on the line. Trim the little triangle off the end a 1/4" from your stitch line. Set the seam and press to one side. Repeat for the other three flying geese.
Place a green square RST on the other end of the flying goose. Draw a line diagonally on the square and sew directly on the line. Trim the little triangle off the end a 1/4" from your stitch line. Set the seam and press to one side. Repeat for the other three flying geese.


The inside nine pieces are essentially a nine patch with the pinwheel the centre of the nine patch. Sew the pieces together like any of your other nine patches.


Once the centre nine patch is sewn together you have the centre of another nine patch to put together. Once again, sew these pieces together like other nine patches.


With that our first block for week 32 is finished!


Our second block for week 32 is Block #24 - Country Path.

Cut one 2 5/8" x 2 5/8" blue square.
Cut two 1 1/2" x 1 1/2" grey squares.
Cut four 1 5/8" x 1 5/8" blue squares.
Cut four 1 5/8" x 1 5/8" raspberry squares.
Cut four 1 5/8" x 1 5/8" purple squares.
Cut four 2" x 2" blue squares.
Cut two 2 3/4" x 2 3/4" grey squares.
Cut one 2 3/4" x 2 3/4" purple square.
Cut one 2 3/4" x 2 3/4" raspberry square.


Place one 2 5/8" grey square RST with one 2 5/8" blue square and make it into HSTs. Place your ruler perpendicular to your stitch line and cut it in half. Repeat for the other 2 5/8" grey square and the 2 5/8" raspberry square.


Place one 1 1/2" grey square RST in the corner of the 2 5/8" blue square and draw a line diagonally across the grey square. Sew directly on the line. Trim the little triangle off the end a 1/4" from your stitch line. Set the seam and press to one side. Repeat with the other 1 1/2" grey square in the opposite corner of the blue square.


Organize your pieces the way you want them to look. Sew together the little squares in pairs.

Place one of the half QSTs RST with one of the blue squares. Sew a 1/4" seam, set the seam and press to one side. Repeat for each of the other blue squares.


Sew the square strips onto the centre square.

Place another half QST RST with one of the blue square. Sew a 1/4" seam, set the seam and press to one side. Repeat for each of the other blue squares.


Place one of the triangles you pieced RST along the edge of the square you pieced. Sew a 1/4" seam, set the seam and press to one side. Repeat for the other side of the square. 


Turn your square and place one of the remaining two triangles on the edge of the square, sew a 1/4" seam, set the seam and press to one side. Repeat with the last triangle on the last side of the square and your second block for week 32 is finished.


Our first block for week 33 is Block #27 - Darting Birds.

Cut four 1 1/2" x 1 1/2" purple squares.
Cut four 1 1/2" x 1 1/2" grey squares.
Cut eight 2" x 2" purple squares.
Cut eight 2" x 2" grey squares.
Cut two 2 7/8" x 2 7/8" purple squares. Cut these on the diagonal.
Cut four 2" x 2" grey squares. Cut these on the diagonal.


Take each of your 2" purple squares and place them RST with each of the 2" grey squares and make them into HSTs.

Place one grey triangle RST with a purple square with the corners matching. Sew a 1/4" seam, set the seam and press to one side. Repeat with the other three purple squares. Place another grey triangle RST with a purple square with the corners matching. Sew a 1/4" seam, set the seam and press to one side.


Place one purple triangle RST with a purple/grey triangle with corners matching. Sew a 1/4" seam, set the seam and press to one side. Repeat for the other three purple triangles.

Sew the HSTs together in pairs, watching orientation. If you look at the picture to the right you will see that I got the orientation mucked up.


Place  one of the small grey square RST onto one of the HST pairs, sew a 1/4" seam, set the seam and press to one side. Repeat for the other three grey squares.

Place one of the HST pairs RST with the blue grey square that you pieced, sew a 1/4" seam, set the seam and press to one side. Repeat for the other three HST pairs.

Haven't caught my orientation mistake yet!


Now I caught my orientation mistake. Stitch ripper time!

Place one of the remaining HST strips RST with the other piece you previously pieced. Sew a 1/4" seam, set the seam and press to one side. Repeat for the other three HST strips.


You now have a regular four patch to put together.


With that, the first block for week 33 is done!


Our second block for week 33 is Block #36 - Flower Garden Path.

Cut two 2" x 2" blue squares.
Cut two 2" x 2" orange squares.
Cut eight 1 1/2" x 1 1/2" blue squares.
Cut two 1 1/2" x 2 1/2" blue squares.
Cut eight 2" x 2" orange squares. Cut these on the diagonal.
Cut two 1 1/2" x 2 1/2" orange squares.
Cut one 2 3/8" x 2 3/8" orange square. Cut this on the diagonal.
Cut four 1 1/4" x 6" green rectangles.


Place one 2" orange square RST with one 2" blue square and make it into HSTs. Repeat with the other blue/orange 2" squares.

Place one blue square RST on the end of one of the orange rectangles and draw a line diagonally across the blue square. Sew directly on the line. Trim the little triangle off the end a 1/4" from your stitch line. Set the seam and press to one side. Repeat with another blue square and the other orange rectangle. Then place a blue square on the opposite end of the orange rectangle and draw a line diagonally across the blue square. Sew directly on the line. Trim the little triangle off the end a 1/4" from your stitch line. Set the seam and press to one side. Repeat with another blue square and the other orange rectangle. 


Place one orange triangle RST with a orange/blue HST with the corners matching. Sew a 1/4" seam, set the seam and press to one side. Repeat with the other three orange/blue HSTs. Place another orange triangle RST with the orange/blue HST with the corners matching. Sew a 1/4" seam, set the seam and press to one side. Repeat with the other three orange/blue HSTs.

Place one orange triangle RST with a blue square with the corners matching. Sew a 1/4" seam, set the seam and press to one side. Repeat with the other three blue squares. Place another orange triangle RST with the blue square with the corners matching. Sew a 1/4" seam, set the seam and press to one side. Repeat with the other three blue squares.

Next place a blue rectangle RST with your flying goose, sew a 1/4" seam, set the seam and press to one side. Repeat for the other three flying geese and blue rectangles. Then centre the long edge of the orange triangle RST along the tip of the flying goose. Sew a 1/4" seam, set the seam and press to one side. Repeat for the other orange triangle and flying goose.


Place the corner of the orange/blue HST triangle RST with the corner of the flying goose rectangle. Sew a 1/4" seam, set the seam and press to one side. Repeat with the other flying goose rectangle and an orange/blue HST triangle.

Then place another orange/blue HST triangle RST with the other corner of the flying goose rectangle. Sew a 1/4" seam, set the seam and press to one side. Repeat with the other flying goose rectangle and an orange/blue HST triangle.


Place the corner of the long green rectangle RST with the bottom corner of the large triangle you pieced. Sew a 1/4" seam, set the seam and press to one side. Repeat with the other triangle you pieced and a long green rectangle. 

Place the corner of another long green rectangle RST with the bottom corner of the opposite side of the large green triangle you pieced. Sew a 1/4" seam, set the seam and press to one side. Repeat with the other triangle you pieced and a long green rectangle. 


Place the smaller orange/blue triangle RST with the green edge on the large triangle. The seam line of the blue square should line up with the seam line from the blue triangles. Sew a 1/4" seam, set the seam and press to one side. Repeat with the other orange/blue triangles.


Place the two rectangles RST so that the straight edges line up. Sew a 1/4" seam as if the little green triangles weren't sticking out and set the seam. 


Place your ruler along your stitch line and cut off 1/4" from you seam line. Press the seam to one side and your second and final block for week 33 is finished.


That's it for this week and while I have the blocks sewn for next week, Spring Break is coming up for the kids so I need to get ahead enough to have the blocks sewn for that week before they are actually off for the whole week. I know that I won't get any sewing done that week while they are home so I need to have the sewing done ahead of time.

Otherwise, I am quite happy for us to be all caught up.

I'll see you next week. Have fun!

Tara