Friday, September 12, 2014

Agri-Spouse Friday - Week 7

Have you ever had one of those weeks? This was one of those weeks for me. When you live in Alberta you learn to accept snow whenever it comes. I have lived in Alberta since 1985 and have had snow on the ground during every month of the year. Twice actually. Yes, I have seen snow on the ground in June, July and August. Twice. During different years certainly but it has happened. For all of that, I love Alberta and wouldn't want to live anywhere else.

So, yes, we had snow this week. We didn't get quite as much snow as places in Alberta further south of here but we had snow. Panorama posted this shot:


This was how much snow they received earlier this week. We didn't get that much here thank goodness.

Brianna received her half-yellow belt in Tae Kwon Do on Tuesday. She has passed out of Little Dragons now and is into the bigger kids children class officially. That does mean that I now have to buy her sparring gear since they do full on sparring once they get to half-yellow. I just can't imagine anyone kicking and whomping on our little girl, pads or not.

Rhylee has decided to join the competitive team at Tae Kwon Do. I wasn't sure how he would do. They have two rules. No whining and no quitting. I didn't expect Rhylee to finish the tryout class and make the team with those rules but he did! He also managed to complete the classes on Tuesday and Thursday. He was pushed hard and still wants to keep going. I think it will be good for him to keep it up but I didn't think he would do it. Yay him!

The real problem though was a certain Farmer's Wife Alonger's two boys. The two of them are lucky to have survived the week. Now, I'm not saying who these two boys are but I will say that it may particularly be the "Mighty Eskimo". Because of those two boys, I ended up having to drive downtown FOUR times this week. GAH! Today I had to drive downtown to get a bowtie. We are going to a Mess Dinner tomorrow night for the "Battle of Panjiway". I'll be honest, I don't even know where Panjiway is but we are going to a dinner to commemorate it. 

As with other Mess Dinners, he will wear his fancy Military Tux and I wear a lovely red gown. Hopefully this time we will get someone to take a picture of the two of us together. With that said, we checked on his mess kit the other day and realized that somehow we had misplaced his bowtie. How does that happen? How do you lose a bowtie that doesn't even untie?

With that said, here are the photos from the blocks last week.

Marian's Broken Sugar Bowl:


Suzanne's Broken Sugar Bowl:


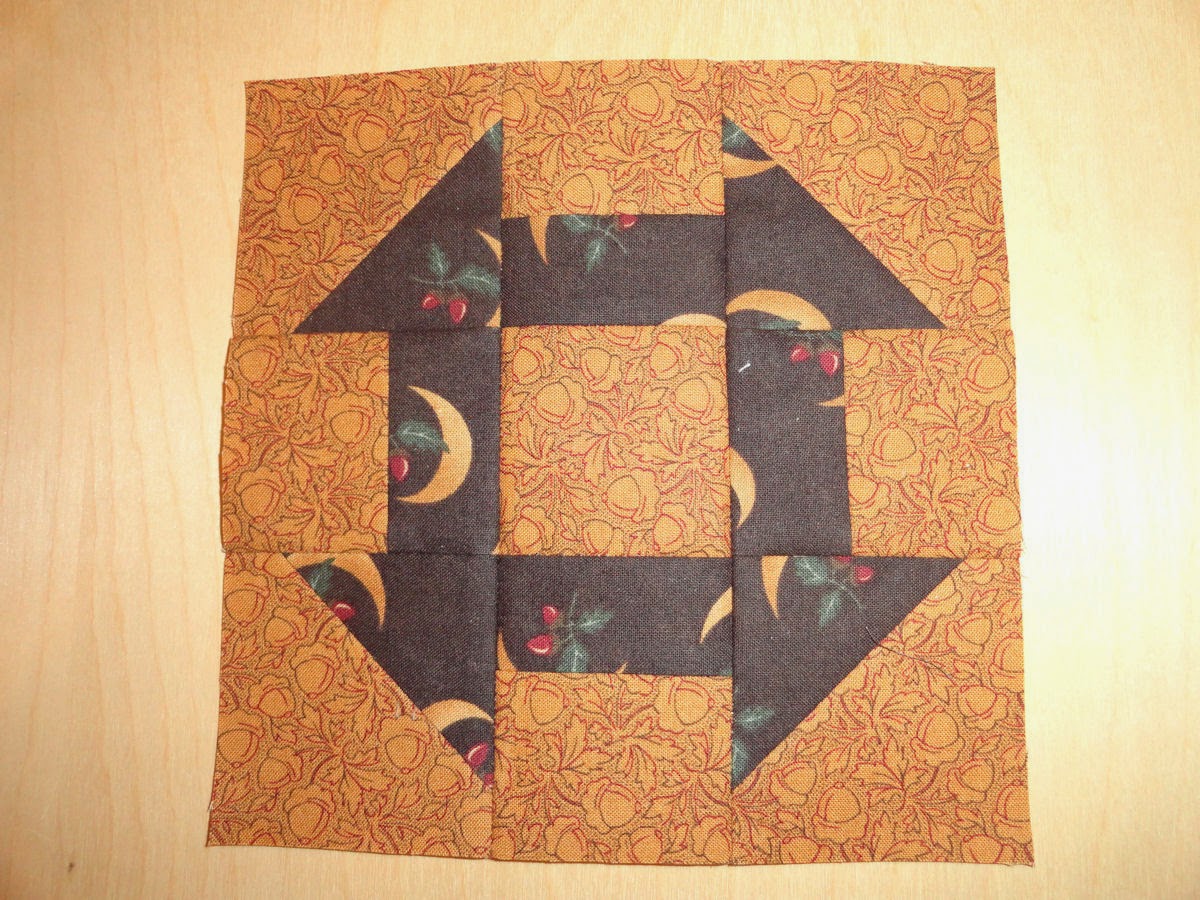
Marian's Prairie Queen:


And Suzanne's Prairie Queen:


And now for this week's blocks. This week's blocks are very similar to last week's blocks. Again, I am going to use my colours just for descriptive purposes.

We'll start this week with Block #72 - Railroad.

Cut two black squares 3" x 3".
Cut two green squares 3" x 3".
Cut ten black squares 1 1/2" by 1 1/2".
Cut ten green squares 1 1/2" by 1 1/2".


Place one 3" green square RST with one 3" black square. Pin on the diagonal. Draw a line diagonally on the wrong side of the lighter fabric. Sew a seam 1/4" from the line you have just drawn and then sew a 1/4" seam on the other side of the line you drew. Then place your ruler along the line you drew and slice the two HSTs apart Set the seam and press to one side. Place the other 3" green square RST with he remaining black 3" square and repeat the HST process. Trim your HSTs to 2 1/2" square. You should now have four green/black HSTs that measure 2 1/2".


Place one 1 1/2" green square RST with one 1 1/2" black square and sew a 1/4" seam. Set the seam and press toward the darker fabric. Repeat for the other nine 1 1/2" square sets. Take one green/black square set and place it RST with another green/black square set so that the opposite colours are together and the seams nest neatly and sew a 1/4" seam. Repeat for the other green/black square sets until you have five green/black four patch sets. Organize your pieces RSU the way you want them to look.


Flip square 2 RST onto square 3 and sew a 1/4" seam. Set the seam and press toward square 3. Flip square 5 RST onto square 6 and sew a 1/4" seam. Set the seam and press toward square 5. Flip square 8 RST onto square 9 and sew a 1/4" seam. Set the seam and press toward square 9. Flip square 1 RST onto square 4 and sew a 1/4" seam. Set the seam and press toward square 4.


Now flip square 7 RST onto square 4 and sew a 1/4" seam. Set the seam and press toward square 4. Flip the 2/3 set RST onto the 5/6 set, nest the seams neatly and sew a 1/4" seam. Set the seam and press toward the 2/3 set. Flip the 8/9 set RST onto the 5/6 set, nest the seams neatly and sew a 1/4" seam. Set the seam and press toward the 8/9 set. Flip the 1/4/7 set RST on the 2/5/8 piece, nest the seams neatly and sew a 1/4" seam. Set the seam and press to one side and the first block is finished.


Next we'll do Block #98 - Waterwheel.


Cut one brown square 3" by 3".
Cut one pink square 3" by 3".
Cut two blue square 3" by 3".
Cut eight blue squares 1 1/2" by 1 1/2".
Cut four orange squares 1 1/2" by 1 1/2".
Cut four pink squares 1 1/2" by 1 1/2".
Cut four brown squares 1 1/2" by 1 1/2".


Place one 3" blue square RST with one 3" pink square. Pin on the diagonal. Draw a line diagonally on the wrong side of the lighter fabric. Sew a seam 1/4" from the line you have just drawn and then sew a 1/4" seam on the other side of the line you drew. Then place your ruler along the line you drew and slice the two HSTs apart Set the seam and press to one side. Place the other 3" blue square RST with the remaining brown 3" square and repeat the HST process. Trim your HSTs to 2 1/2" square. You should now have four green/black HSTs that measure 2 1/2".


Place one 1 1/2" blue square RST with one 1 1/2" orange square and sew a 1/4" seam. Set the seam and press toward the darker fabric. Repeat to make two pink/brown sets. Then repeat for the rest of the 1 1/2" squares, matching a blue square with another colour. Organize the sets RSU in the correct order. Take one square set and place it RST with another square set so that the the seams nest neatly and sew a 1/4" seam. Repeat for the other square sets until you have five four patch sets. Organize your pieces RSU the way you want them to look.


Flip square 2 RST onto square 3 and sew a 1/4" seam. Set the seam and press toward square 3. Flip square 5 RST onto square 6 and sew a 1/4" seam. Set the seam and press toward square 5. Flip square 8 RST onto square 9 and sew a 1/4" seam. Set the seam and press toward square 9. Flip square 1 RST onto square 4 and sew a 1/4" seam. Set the seam and press toward square 4.


Now flip square 7 RST onto square 4 and sew a 1/4" seam. Set the seam and press toward square 4. Flip the 2/3 set RST onto the 5/6 set, nest the seams neatly and sew a 1/4" seam. Set the seam and press toward the 2/3 set. Flip the 8/9 set RST onto the 5/6 set, nest the seams neatly and sew a 1/4" seam. Set the seam and press toward the 8/9 set. Flip the 1/4/7 set RST on the 2/5/8 piece, nest the seams neatly and sew a 1/4" seam. Set the seam and press to one side and the second block is finished.


This week's blocks weren't very different from last week's blocks so I would think that there shouldn't be any problems if you managed to complete last week's block. Suzanne and Marian finished theirs and I think Mom should be getting going with her blocks soon. 

I am looking forward to getting a better handle on our schedules and getting a bit more done in my sewing room. I did manage to get a bit of sewing room organizing done this week but I did not actually get any sewing done. With a bit of luck I will get some sewing done next week.

See you next week!

Tara

Friday, September 5, 2014

Agri-Spouse Friday - Week 6

Welcome back to our Agri-Spouse Along!


For the last few weeks we have been working on a theme of the nine patch with HSTs. The blocks started our fairly simply and have gotten slightly more complicated. Last week we put together the "Wrench" and the "Churn Dash" blocks.

Here is Marian's Wrench:


And Suzanne's Wrench:


Marian's Churn Dash:


And Suzanne's Churn Dash:


Those two blocks are very similar to each other. The only difference is that one uses the same fabric for half of the HST and the rectangles while the other uses two different fabrics. That's it. Otherwise the two blocks are really the same.

This week we will do two blocks that are similar except that the rectangle sections are going to be four patch sections. Arrangement and colour differences will make the blocks look different but there really isn't anything new here!

The first block this week will be Block #70 - Prairie Queen.

Cut two 3" by 3" red squares and two 3" by 3" black squares.
Cut  eight 1 1/2" by 1 1/2" red squares and eight 1 1/2" by 1 1/2" black squares.
Cut one 2 1/2" by 2 1/2" black square.


Place one 3" red square RST with one 3" black square. Pin on the diagonal. Draw a line diagonally on the wrong side of the lighter fabric. Sew a seam 1/4" from the line you have just drawn and then sew a 1/4" seam on the other side of the line you drew. Then place your ruler along the line you drew and slice the two HSTs apart Set the seam and press to one side. Place the other 3" red square RST with he remaining black 3" square and repeat the HST process. Trim your HSTs to 2 1/2" square. You should now have four red/black HSTs that measure 2 1/2".


Place one 1 1/2" red square RST with one 1 1/2" black square and sew a 1/4" seam. Set the seam and press toward the darker fabric. Repeat for the other seven 1 1/2" square sets. Take one red/black square set and place it RST with another red/black square set so that the opposite colours are together and the seams nest neatly and sew a 1/4" seam. Repeat for the other red/black square sets until you have four red/black four patch sets. Organize your pieces RSU the way you want them to look.


Flip square 2 RST onto square 3 and sew a 1/4" seam. Set the seam and press toward square 3. Flip square 5 RST onto square 6 and sew a 1/4" seam. Set the seam and press toward square 5. Flip square 8 RST onto square 9 and sew a 1/4" seam. Set the seam and press toward square 9. Flip square 1 RST onto square 4 and sew a 1/4" seam. Set the seam and press toward square 4.


Now flip square 7 RST onto square 4 and sew a 1/4" seam. Set the seam and press toward square 4. Flip the 2/3 set RST onto the 5/6 set, nest the seams neatly and sew a 1/4" seam. Set the seam and press toward the 2/3 set. Flip the 8/9 set RST onto the 5/6 set, nest the seams neatly and sew a 1/4" seam. Set the seam and press toward the 8/9 set. Flip the 1/4/7 set RST on the 2/5/8 piece, nest the seams neatly and sew a 1/4" seam. Set the seam and press to one side and the first block is finished.


The second block this week will be Block #12 - Broken Sugar Bowl.

Cut two 3" by 3" green squares and two 3" by 3" purple squares.
Cut  four 1 1/2" by 1 1/2" purple squares, four 1 1/2" by 1 1/2" green squares and four 1 1/2" by 1 1/2" orange squares.
Cut two 2 1/2" by 2 1/2" orange squares.


Place one 3" green square RST with one 3" purple square. Pin on the diagonal. Draw a line diagonally on the wrong side of the lighter fabric. Sew a seam 1/4" from the line you have just drawn and then sew a 1/4" seam on the other side of the line you drew. Then place your ruler along the line you drew and slice the two HSTs apart Set the seam and press to one side. Place the other 3" green square RST with he remaining purple 3" square and repeat the HST process. Trim your HSTs to 2 1/2" square. You should now have four green/purple HSTs that measure 2 1/2".


Place one 1 1/2" green square RST with one 1 1/2" orange square and sew a 1/4" seam. Set the seam and press toward the darker fabric. Repeat one other orange/green 1 1/2" square sets. Take one orange/green square set and place it RST with another orange/green square set so that the opposite colours are together and the seams nest neatly and sew a 1/4" seam. Set the seam and press to one side. Place one orange 1 1/2" square RST with one purple 1 1/2" square and sew a 1/4" square. Set the seam and press toward the purple. Place one green 1 1/2" square RST with one purple 1 1/2" square and sew a 1/4" seam. Set the seam and press toward the purple. Take one orange/purple set and place it RST with the green/purple set so that the purples are opposite of each other and sew a 1/4" seam. Set the seam and press to one side. Organize your four patch sets, your HSTs and the two orange 2 1/2" squares RSU the way you want them to look.


Flip square 2 RST onto square 3 and sew a 1/4" seam. Set the seam and press toward square 3. Flip square 5 RST onto square 6 and sew a 1/4" seam. Set the seam and press toward square 5. Flip square 8 RST onto square 9 and sew a 1/4" seam. Set the seam and press toward square 9. Flip square 1 RST onto square 4 and sew a 1/4" seam. Set the seam and press toward square 4.

Now flip square 7 RST onto square 4 and sew a 1/4" seam. Set the seam and press toward square 4. Flip the 2/3 set RST onto the 5/6 set, nest the seams neatly and sew a 1/4" seam. Set the seam and press toward the 2/3 set. Flip the 8/9 set RST onto the 5/6 set, nest the seams neatly and sew a 1/4" seam. Set the seam and press toward the 8/9 set. Flip the 1/4/7 set RST on the 2/5/8 piece, nest the seams neatly and sew a 1/4" seam. Set the seam and press to one side and the first block is finished.


I am so glad that everyone is enjoying this. I sure am!

Next week we will move forward again. Now that September is here Mom is hoping to get started. Her plan is to now be able to start going to the quilting meetings again so hopefully she can get hands on help where she needs it.

See you next week!

Tara


Tuesday, September 2, 2014

A Late Agri-Spouse Friday - Week 5

Welcome back to our Agri-Spouse Along! The last few weeks we have been working on a "theme" of blocks that involve a nine patch of blocks with HSTs. We will continue on that theme this week while making what were solid squares the last few weeks slightly more complicated but truly, only slightly.

First though, I will add the photos of blocks that I have received. Suzanne was away last week so couldn't get block photos in but we will start with her Week 3 block photos.

First is Suzanne's Spool:


Next was her Friendship Star:


And last was her Contrary Wife:


Lovely!

Now on to this week. This post is obviously late but things got a little bit crazy this past week with the last long weekend of the summer. The photos from last week are:

Marian's Snowball:


And Suzanne's Snowball:


Then we have Marian's Calico Puzzle:


And Suzanne's Calico Puzzle:


We went away for the last long weekend of the summer. We got a new camper at the beginning of the summer and took it to the Rocky Mountain House area for a family reunion the weekend just before Canada Day. Unfortunately, we got back from that and Quinn had to fly out to New Brunswick for a month long army course. There were a few fun days there since the airline lost his luggage and no sooner did he get that back when Tropical Storm Arthur hit and they were all out of power for a few days. He did end up having a good course there though. When he got back to Alberta he was home for 14 hours and had to head up to Fort McMurray for a couple of weeks to work on audit.


With all of that, this weekend was the second time we managed to get our trailer out and we took it out past Nordegg for and unofficial army gathering that they call "Alpine Gunner". This is camping for the weekend along with a hike up a mountain for those who wish to participate and a geo-cache at the top. There is a partially buried artillery casing at the top that had a book to sign and an artillery flag to run up a flagpole (this is actually a very large stick/branch that they buried in last year) but someone stole those items since last year. One of the hikers had something with them that they could use as a new sign in book so they started a new book but everyone was pretty ticked off that the old book was stolen.


Well, the two boys hiked up to the top of the mountain. It took 23 years for Quinn to make that hike the first time but Rhylee made it up at just nine and a half years old! It took them almost eight hours to make it all the way up and down but they made it! Yay for my boys.

Brianna turns seven today and we can't believe how big she has gotten. She started grade two today and she got the teacher that she had in kindergarten who is now teaching grade two instead of kindergarten. Her grade one teacher is teaching kindergarten now. Rhylee's grade one teacher is teaching grade five but she isn't his home teacher. The grade five teachers "team teach" so he has one teacher in the morning and the other in the afternoon and another class has the opposite. I just don't know the opposite teacher yet.

It's been a great summer but it's great to be back to school too. Now, it's time to get back to work again so back to our Farmer's Wife.

If you got the blocks put together last week then you won't have any trouble this week either!

The first block this week will be Block #111 - Wrench.

Cut two 3" by 3" grey squares and two 3" by 3" red squares.
Cut four 2 1/2" by 1 1/2" red rectangles and four 2 1/2" by 1 1/2" grey rectangles.
Cut one 2 1/2" by 2 1/2" grey square. 

Place one 3" red square RST with one 3" grey square. Pin on the diagonal. Draw a line diagonally on the wrong side of the lighter fabric. Sew a seam 1/4" from the line you have just drawn and then sew a seam on the other side of the line you drew. Then place your ruler along the line you drew and slice the two HSTs apart. Set the seam and press to one side. Place the other 3" red square RST with the other 3" grey square and repeat the HST process. Trim your HSTs to 2 1/2" squares. You should now have four red/grey HSTs.


Place one 2 1/2" by 1 1/2" red rectangle RST with one 2 1/2" by 1 1/2" grey rectangle and sew a sew a 1/4" seam. Set the seam and press the seam toward the darker fabric. Repeat the process for the other three red/grey rectangles. Arrange your pieces RSU the way you want them to look.


Flip square 2 RST onto square 3 and sew a 1/4" seam. Set the seam and press toward square 3. Flip square 5 RST onto square 6 and sew a 1/4" seam. Set the seam and press toward square 5. Flip square 8 RST onto square 9 and sew a 1/4" seam. Set the seam and press toward square 9. Flip square 1 RST onto square 4 and sew a 1/4" seam. Set the seam and press toward square 4.


Now flip square 7 RST onto square 4 and sew a 1/4" seam. Set the seam and press toward square 4. Flip the 2/3 set RST onto the 5/6 set, nest the seams neatly and sew a 1/4" seam. Set the seam and press toward the 2/3 set. Flip the 8/9 set RST onto the 5/6 set, nest the seams neatly and sew a 1/4" seam. Set the seam and press toward the 8/9 set. Flip the 1/4/7 set RST on the 2/5/8 piece, nest the seams neatly and sew a 1/4" seams. Set the seam and press to one side and the first block is finished.


Our second block is remarkably similar to our first block. The only difference between the two blocks is that while "Wrench" has the inner rectangles the same fabric as one half of the HSTs, in our second block the rectangles and HSTs are different colours.


With that, our second block this week is Block #20 - Churn Dash.

Cut two 3" by 3" blue squares and two 3" by 3" dark purple squares.
Cut four 2 1/2" by 1 1/2" blue rectangles and four 2 1/2" by 1 1/2" light purple rectangles.
Cut one 2 1/2" by 2 1/2" blue square. 


Place one 3" blue square RST with one 3" dark purple square. Pin on the diagonal. Draw a line diagonally on the wrong side of the lighter fabric. Sew a seam 1/4" from the line you have just drawn and then sew a seam on the other side of the line you drew. Then place your ruler along the line you drew and slice the two HSTs apart. Set the seam and press to one side. Place the other 3" blue square RST with the other 3" dark purple square and repeat the HST process. Trim your HSTs to 2 1/2" squares. You should now have four blue/dark purple HSTs.


Place one 2 1/2" by 1 1/2" blue rectangle RST with one 2 1/2" by 1 1/2" light purple rectangle and sew a sew a 1/4" seam. Set the seam and press the seam toward the darker fabric. Repeat the process for the other three blue/light purple rectangles. Arrange your pieces RSU the way you want them to look.


Flip square 2 RST onto square 3 and sew a 1/4" seam. Set the seam and press toward square 3. Flip square 5 RST onto square 6 and sew a 1/4" seam. Set the seam and press toward square 5. Flip square 8 RST onto square 9 and sew a 1/4" seam. Set the seam and press toward square 9. Flip square 1 RST onto square 4 and sew a 1/4" seam. Set the seam and press toward square 4.


Now flip square 7 RST onto square 4 and sew a 1/4" seam. Set the seam and press toward square 4. Flip the 2/3 set RST onto the 5/6 set, nest the seams neatly and sew a 1/4" seam. Set the seam and press toward the 2/3 set. Flip the 8/9 set RST onto the 5/6 set, nest the seams neatly and sew a 1/4" seam. Set the seam and press toward the 8/9 set. Flip the 1/4/7 set RST on the 2/5/8 piece, nest the seams neatly and sew a 1/4" seams. Set the seam and press to one side.


That is our second block for the week finished. These two block are essentially the same except for colour choices. They are also very similar to the blocks from the previous few weeks except for the fact that the squares are two rectangles sewn together to make a square.

Next week we will continue to expand on the theme from the last few weeks.

See you on Friday even if it is only a few days away! Sorry about the delay all.


Tara.