Welcome back to our Agri-Spouse Along! The last few weeks we have been working on a "theme" of blocks that involve a nine patch of blocks with HSTs. We will continue on that theme this week while making what were solid squares the last few weeks slightly more complicated but truly, only slightly.
First though, I will add the photos of blocks that I have received. Suzanne was away last week so couldn't get block photos in but we will start with her Week 3 block photos.
First is Suzanne's Spool:
Next was her Friendship Star:
And last was her Contrary Wife:
Lovely!
Now on to this week. This post is obviously late but things got a little bit crazy this past week with the last long weekend of the summer. The photos from last week are:
Marian's Snowball:
And Suzanne's Snowball:
Then we have Marian's Calico Puzzle:
And Suzanne's Calico Puzzle:
We went away for the last long weekend of the summer. We got a new camper at the beginning of the summer and took it to the Rocky Mountain House area for a family reunion the weekend just before Canada Day. Unfortunately, we got back from that and Quinn had to fly out to New Brunswick for a month long army course. There were a few fun days there since the airline lost his luggage and no sooner did he get that back when Tropical Storm Arthur hit and they were all out of power for a few days. He did end up having a good course there though. When he got back to Alberta he was home for 14 hours and had to head up to Fort McMurray for a couple of weeks to work on audit.


With all of that, this weekend was the second time we managed to get our trailer out and we took it out past Nordegg for and unofficial army gathering that they call "Alpine Gunner". This is camping for the weekend along with a hike up a mountain for those who wish to participate and a geo-cache at the top. There is a partially buried artillery casing at the top that had a book to sign and an artillery flag to run up a flagpole (this is actually a very large stick/branch that they buried in last year) but someone stole those items since last year. One of the hikers had something with them that they could use as a new sign in book so they started a new book but everyone was pretty ticked off that the old book was stolen.


Well, the two boys hiked up to the top of the mountain. It took 23 years for Quinn to make that hike the first time but Rhylee made it up at just nine and a half years old! It took them almost eight hours to make it all the way up and down but they made it! Yay for my boys.
Brianna turns seven today and we can't believe how big she has gotten. She started grade two today and she got the teacher that she had in kindergarten who is now teaching grade two instead of kindergarten. Her grade one teacher is teaching kindergarten now. Rhylee's grade one teacher is teaching grade five but she isn't his home teacher. The grade five teachers "team teach" so he has one teacher in the morning and the other in the afternoon and another class has the opposite. I just don't know the opposite teacher yet.
It's been a great summer but it's great to be back to school too. Now, it's time to get back to work again so back to our Farmer's Wife.
If you got the blocks put together last week then you won't have any trouble this week either!
The first block this week will be Block #111 - Wrench.
 Cut two 3" by 3" grey squares and two 3" by 3" red squares.
Cut four 2 1/2" by 1 1/2" red rectangles and four 2 1/2" by 1 1/2" grey rectangles.
Cut one 2 1/2" by 2 1/2" grey square.
Place one 3" red square RST with one 3" grey square. Pin on the diagonal. Draw a line diagonally on the wrong side of the lighter fabric. Sew a seam 1/4" from the line you have just drawn and then sew a seam on the other side of the line you drew. Then place your ruler along the line you drew and slice the two HSTs apart. Set the seam and press to one side. Place the other 3" red square RST with the other 3" grey square and repeat the HST process. Trim your HSTs to 2 1/2" squares. You should now have four red/grey HSTs.
Place one 2 1/2" by 1 1/2" red rectangle RST with one 2 1/2" by 1 1/2" grey rectangle and sew a sew a 1/4" seam. Set the seam and press the seam toward the darker fabric. Repeat the process for the other three red/grey rectangles. Arrange your pieces RSU the way you want them to look.
Cut two 3" by 3" grey squares and two 3" by 3" red squares.
Cut four 2 1/2" by 1 1/2" red rectangles and four 2 1/2" by 1 1/2" grey rectangles.
Cut one 2 1/2" by 2 1/2" grey square.
Place one 3" red square RST with one 3" grey square. Pin on the diagonal. Draw a line diagonally on the wrong side of the lighter fabric. Sew a seam 1/4" from the line you have just drawn and then sew a seam on the other side of the line you drew. Then place your ruler along the line you drew and slice the two HSTs apart. Set the seam and press to one side. Place the other 3" red square RST with the other 3" grey square and repeat the HST process. Trim your HSTs to 2 1/2" squares. You should now have four red/grey HSTs.
Place one 2 1/2" by 1 1/2" red rectangle RST with one 2 1/2" by 1 1/2" grey rectangle and sew a sew a 1/4" seam. Set the seam and press the seam toward the darker fabric. Repeat the process for the other three red/grey rectangles. Arrange your pieces RSU the way you want them to look.
 Flip square 2 RST onto square 3 and sew a 1/4" seam. Set the seam and press toward square 3. Flip square 5 RST onto square 6 and sew a 1/4" seam. Set the seam and press toward square 5. Flip square 8 RST onto square 9 and sew a 1/4" seam. Set the seam and press toward square 9. Flip square 1 RST onto square 4 and sew a 1/4" seam. Set the seam and press toward square 4.
 Now flip square 7 RST onto square 4 and sew a 1/4" seam. Set the seam and press toward square 4. Flip the 2/3 set RST onto the 5/6 set, nest the seams neatly and sew a 1/4" seam. Set the seam and press toward the 2/3 set. Flip the 8/9 set RST onto the 5/6 set, nest the seams neatly and sew a 1/4" seam. Set the seam and press toward the 8/9 set. Flip the 1/4/7 set RST on the 2/5/8 piece, nest the seams neatly and sew a 1/4" seams. Set the seam and press to one side and the first block is finished.
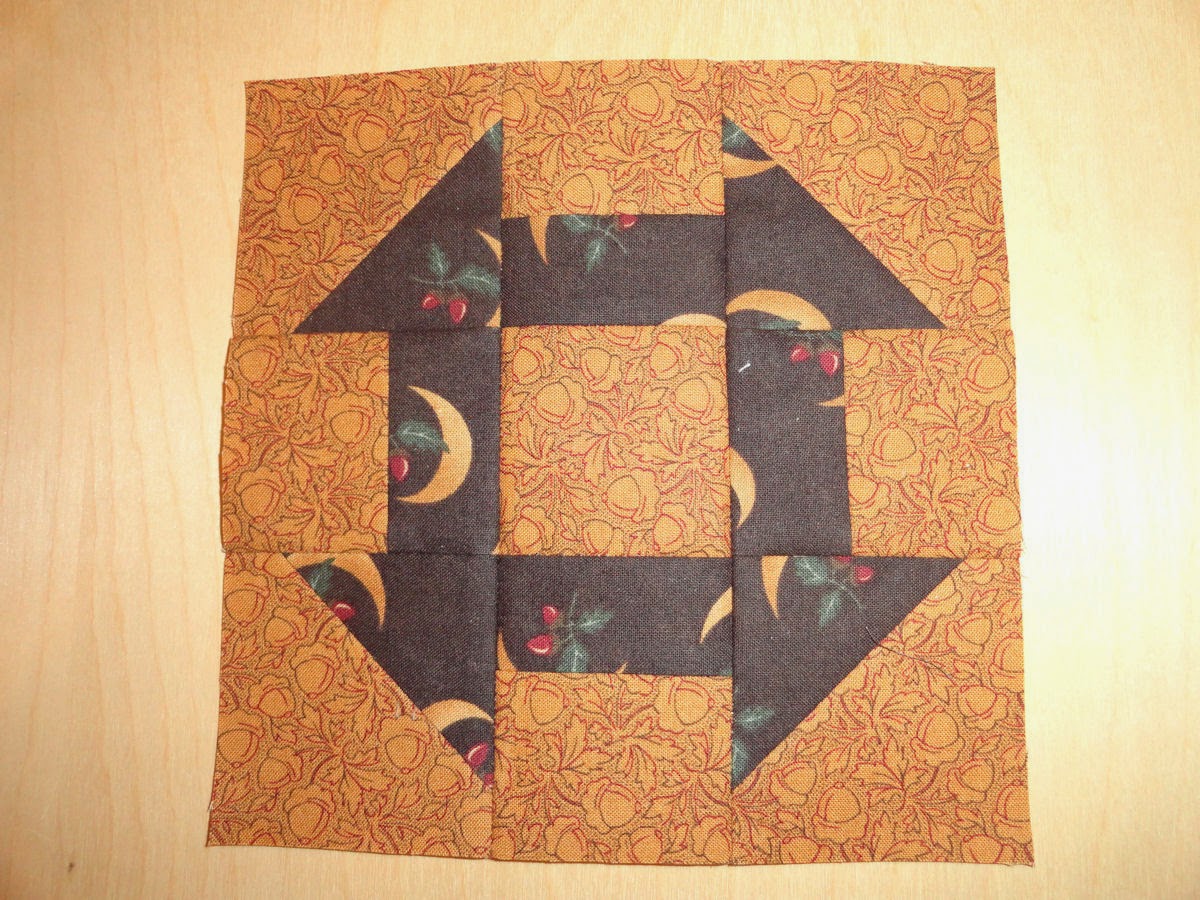
Our second block is remarkably similar to our first block. The only difference between the two blocks is that while "Wrench" has the inner rectangles the same fabric as one half of the HSTs, in our second block the rectangles and HSTs are different colours.
With that, our second block this week is Block #20 - Churn Dash.
Now flip square 7 RST onto square 4 and sew a 1/4" seam. Set the seam and press toward square 4. Flip the 2/3 set RST onto the 5/6 set, nest the seams neatly and sew a 1/4" seam. Set the seam and press toward the 2/3 set. Flip the 8/9 set RST onto the 5/6 set, nest the seams neatly and sew a 1/4" seam. Set the seam and press toward the 8/9 set. Flip the 1/4/7 set RST on the 2/5/8 piece, nest the seams neatly and sew a 1/4" seams. Set the seam and press to one side and the first block is finished.
Our second block is remarkably similar to our first block. The only difference between the two blocks is that while "Wrench" has the inner rectangles the same fabric as one half of the HSTs, in our second block the rectangles and HSTs are different colours.
With that, our second block this week is Block #20 - Churn Dash.
 Cut two 3" by 3" blue squares and two 3" by 3" dark purple squares.
Cut four 2 1/2" by 1 1/2" blue rectangles and four 2 1/2" by 1 1/2" light purple rectangles.
Cut one 2 1/2" by 2 1/2" blue square.
Place one 3" blue square RST with one 3" dark purple square. Pin on the diagonal. Draw a line diagonally on the wrong side of the lighter fabric. Sew a seam 1/4" from the line you have just drawn and then sew a seam on the other side of the line you drew. Then place your ruler along the line you drew and slice the two HSTs apart. Set the seam and press to one side. Place the other 3" blue square RST with the other 3" dark purple square and repeat the HST process. Trim your HSTs to 2 1/2" squares. You should now have four blue/dark purple HSTs.
Place one 2 1/2" by 1 1/2" blue rectangle RST with one 2 1/2" by 1 1/2" light purple rectangle and sew a sew a 1/4" seam. Set the seam and press the seam toward the darker fabric. Repeat the process for the other three blue/light purple rectangles. Arrange your pieces RSU the way you want them to look.
Cut two 3" by 3" blue squares and two 3" by 3" dark purple squares.
Cut four 2 1/2" by 1 1/2" blue rectangles and four 2 1/2" by 1 1/2" light purple rectangles.
Cut one 2 1/2" by 2 1/2" blue square.
Place one 3" blue square RST with one 3" dark purple square. Pin on the diagonal. Draw a line diagonally on the wrong side of the lighter fabric. Sew a seam 1/4" from the line you have just drawn and then sew a seam on the other side of the line you drew. Then place your ruler along the line you drew and slice the two HSTs apart. Set the seam and press to one side. Place the other 3" blue square RST with the other 3" dark purple square and repeat the HST process. Trim your HSTs to 2 1/2" squares. You should now have four blue/dark purple HSTs.
Place one 2 1/2" by 1 1/2" blue rectangle RST with one 2 1/2" by 1 1/2" light purple rectangle and sew a sew a 1/4" seam. Set the seam and press the seam toward the darker fabric. Repeat the process for the other three blue/light purple rectangles. Arrange your pieces RSU the way you want them to look.
 Flip square 2 RST onto square 3 and sew a 1/4" seam. Set the seam and press toward square 3. Flip square 5 RST onto square 6 and sew a 1/4" seam. Set the seam and press toward square 5. Flip square 8 RST onto square 9 and sew a 1/4" seam. Set the seam and press toward square 9. Flip square 1 RST onto square 4 and sew a 1/4" seam. Set the seam and press toward square 4.
Now flip square 7 RST onto square 4 and sew a 1/4" seam. Set the seam and press toward square 4. Flip the 2/3 set RST onto the 5/6 set, nest the seams neatly and sew a 1/4" seam. Set the seam and press toward the 2/3 set. Flip the 8/9 set RST onto the 5/6 set, nest the seams neatly and sew a 1/4" seam. Set the seam and press toward the 8/9 set. Flip the 1/4/7 set RST on the 2/5/8 piece, nest the seams neatly and sew a 1/4" seams. Set the seam and press to one side.
That is our second block for the week finished. These two block are essentially the same except for colour choices. They are also very similar to the blocks from the previous few weeks except for the fact that the squares are two rectangles sewn together to make a square.
Next week we will continue to expand on the theme from the last few weeks.
See you on Friday even if it is only a few days away! Sorry about the delay all.
Tara.
Flip square 2 RST onto square 3 and sew a 1/4" seam. Set the seam and press toward square 3. Flip square 5 RST onto square 6 and sew a 1/4" seam. Set the seam and press toward square 5. Flip square 8 RST onto square 9 and sew a 1/4" seam. Set the seam and press toward square 9. Flip square 1 RST onto square 4 and sew a 1/4" seam. Set the seam and press toward square 4.
Now flip square 7 RST onto square 4 and sew a 1/4" seam. Set the seam and press toward square 4. Flip the 2/3 set RST onto the 5/6 set, nest the seams neatly and sew a 1/4" seam. Set the seam and press toward the 2/3 set. Flip the 8/9 set RST onto the 5/6 set, nest the seams neatly and sew a 1/4" seam. Set the seam and press toward the 8/9 set. Flip the 1/4/7 set RST on the 2/5/8 piece, nest the seams neatly and sew a 1/4" seams. Set the seam and press to one side.
That is our second block for the week finished. These two block are essentially the same except for colour choices. They are also very similar to the blocks from the previous few weeks except for the fact that the squares are two rectangles sewn together to make a square.
Next week we will continue to expand on the theme from the last few weeks.
See you on Friday even if it is only a few days away! Sorry about the delay all.
Tara.
Welcome back to my Agri-Spouse Friday Quilt Along!
First off, I have pictures from Marian of the two blocks that she made over the last week! Marian is making her Wife scrappy. First off is her Basket Weave. This block looks very much like the picture in the book to me. Amazing how the look of a block changes simply by changing fabrics!
Second is her Autumn Tints. The leaves in the prints even have an autumn feel to me!
And, since I had to edit this post in order to make measurement error changes, I have Suzanne's block photos too! Suzanne is making her Wife scrappy too. First up, Basket Weave.
Second is Suzanne's Autumn Tints.
Next week I will again post any pictures that I receive of this week's completed blocks. It's exciting to me to see other people's finished blocks. Remember, these blocks will measure 6 1/2" when we are finished with them for the day. Later I will give instructions for adding in sashing and cornerstones and then the block will measure 6" final finish. I think I may have caused some confusion. Thank you for your patience. I am learning about writing these patterns and appreciate everyone's corrections.
I figured that we would start with the harder of this week's three blocks so without further ado, the first block up is Block #61 - Northern Lights!
 Cut 1 square 4" by 4" in each of the two colours you have chosen for this block.
Cut 4 squares 2" by 2" in each of the two colours you have chosen for this block.
Place the two large squares RST and pin the two squares together. Draw a line diagonally across one of the fabric squares - whichever one you think you can draw on and see the line.
Cut 1 square 4" by 4" in each of the two colours you have chosen for this block.
Cut 4 squares 2" by 2" in each of the two colours you have chosen for this block.
Place the two large squares RST and pin the two squares together. Draw a line diagonally across one of the fabric squares - whichever one you think you can draw on and see the line.
 Sew a seam a 1/4" from each side of the line. I flipped this over because my lighter thread showed a bit better on the brown fabric for the picture. Slice apart on the line that you drew. Set the seams and press the seam towards the darker fabric and you have two HST sets! Trim each HST set to 3 1/2 ". If you are using a different HST method, you will want the HSTs to finish at 3 1/2" square.
 Next, place a blue and a brown square RST and sew a 1/4" seam. Set the seam and press toward the darker fabric. Repeat for the other three blue and brown sets.
 Place the pieces RSU so you can make sure everything is ending up in the order you want it to. Flip one brown/blue set onto another RST with the middle seam neatly matched. Sew a 1/4" seam, set and press to one side. Repeat for the other four patch.
Place everything RSU in the right order again and flip one HST onto one four patch and sew a 1/4" seam, ensuring you get the right seam line. Set and press toward the HST. Repeat for the other HST/four patch set.
Match the two halves, making sure the centre seam is neatly nested and sew a 1/4" seam along the long side. Set the seam and press to one side and you are finished the first block for this week!
The second block for this week is Block #73 - Rainbow Flowers.
Place the pieces RSU so you can make sure everything is ending up in the order you want it to. Flip one brown/blue set onto another RST with the middle seam neatly matched. Sew a 1/4" seam, set and press to one side. Repeat for the other four patch.
Place everything RSU in the right order again and flip one HST onto one four patch and sew a 1/4" seam, ensuring you get the right seam line. Set and press toward the HST. Repeat for the other HST/four patch set.
Match the two halves, making sure the centre seam is neatly nested and sew a 1/4" seam along the long side. Set the seam and press to one side and you are finished the first block for this week!
The second block for this week is Block #73 - Rainbow Flowers.
 I'm using my colours for descriptive purposes.
Cut one 2" by 2" square in green.
Cut three 2" by 2" squares in yellow.
Cut one 2" by 2" square in blue and two 2" by 3 1/2" rectangles of the same blue.
Cut one 2" by 2" square of the raspberry and then two 2" by 5 1/4" rectangles of the same raspberry.
I'm using my colours for descriptive purposes.
Cut one 2" by 2" square in green.
Cut three 2" by 2" squares in yellow.
Cut one 2" by 2" square in blue and two 2" by 3 1/2" rectangles of the same blue.
Cut one 2" by 2" square of the raspberry and then two 2" by 5 1/4" rectangles of the same raspberry.
 Place the green square RST with one yellow square. Sew a 1/4" seam, set the seam and press the seam to the green square. Place two yellow squares RST and sew a 1/4" seam. Set the seam and press to one side. Place the blue square RST with one blue rectangle. Sew a 1/4" seam on the short side. Set the seam and press to one side. Place the raspberry square RST with one raspberry rectangle and sew a 1/4" seam. Set the seam and press to one side.
Arrange all the pieces RSU for organizational purposes. Flip the green/yellow set onto the yellow/yellow set, RST, making sure to nest the seams neatly and sew a 1/4" seam. Set the seam and press to one side
Place the green square RST with one yellow square. Sew a 1/4" seam, set the seam and press the seam to the green square. Place two yellow squares RST and sew a 1/4" seam. Set the seam and press to one side. Place the blue square RST with one blue rectangle. Sew a 1/4" seam on the short side. Set the seam and press to one side. Place the raspberry square RST with one raspberry rectangle and sew a 1/4" seam. Set the seam and press to one side.
Arrange all the pieces RSU for organizational purposes. Flip the green/yellow set onto the yellow/yellow set, RST, making sure to nest the seams neatly and sew a 1/4" seam. Set the seam and press to one side
 Place the smaller blue rectangle RST along the yellow side of the square you just finished and sew a 1/4" seam. Set the seam and press the seam the opposite way the seam goes for the blue/blue rectangle. Place the long blue rectangle along the top of the yellow square so that the small blue square lines up with the blue rectangle that you already sewed on. Watch for those neatly nested seams! Sew a 1/4" seam. Set the seam and press to one side.
 Place the smaller raspberry rectangle RST with the blue. Sew a 1/4" seam. Set the seam and press the opposite way of the longer raspberry rectangle.
Place the last raspberry rectangle RST along the blue/raspberry so that the raspberry square lines up with the raspberry rectangle you just sewed on and watching for those neatly nested seams. Sew a 1/4" seam, set the seam and press to one side. You are finished the second block for this week!
The third block for this week is Block #48 - Homeward Bound.
Place the smaller raspberry rectangle RST with the blue. Sew a 1/4" seam. Set the seam and press the opposite way of the longer raspberry rectangle.
Place the last raspberry rectangle RST along the blue/raspberry so that the raspberry square lines up with the raspberry rectangle you just sewed on and watching for those neatly nested seams. Sew a 1/4" seam, set the seam and press to one side. You are finished the second block for this week!
The third block for this week is Block #48 - Homeward Bound.
 Once again, this block has nice straight lines.
Cut four 1 1/2" by 1 1/2" squares for the corner pieces. For my block these are blue.
Cut four 2 1/2" by 2 1/2" squares for the cross pieces. For my block these are red.
Cut one 2 1/2" by 2 1/2" square for the centre piece. These are my orange pieces.
Cut twelve 1 1/2" by 1 1/2" squares of the same colour as the centre square. Again, in my case, this is orange.
Once again, this block has nice straight lines.
Cut four 1 1/2" by 1 1/2" squares for the corner pieces. For my block these are blue.
Cut four 2 1/2" by 2 1/2" squares for the cross pieces. For my block these are red.
Cut one 2 1/2" by 2 1/2" square for the centre piece. These are my orange pieces.
Cut twelve 1 1/2" by 1 1/2" squares of the same colour as the centre square. Again, in my case, this is orange.
 Place one blue square RST with one small orange square and sew a 1/4" seam. Set the seam and press to one side. Repeat for the other three blue/orange sets. Place one small orange square with the remaining small orange square RST and sew a 1/4" seam. Set the seam and press to one side. Place one red square RST with the centre orange square and sew a 1/4" seam. Set the seam and press to one side.
 Lay the pieces out in the correct order again for organizational purposes. Make it so that the orange/orange sets and orange/blue sets have the seams pressed the opposite way for nesting purposes. Flip one orange/orange set onto the orange/blue set RST and making sure to match up the centre seam neatly, sew a 1/4" seam. Set the seam and press the seam to one side. Repeat for the other three four patch corner patches.
 Place one four patch RST with one of the red squares and sew a 1/4" seam. Set the seam and press to one side. Repeat for TWO of the remaining three four patch sets.
 Place one four patch/red set RST with the orange/red set and sew a 1/4" seam. Set the seam and press to one side. Place the remaining single four patch RST with one red/four patch set and sew a 1/4" seam. Set the seam and press to one side. Place the remaining red/four patch set RST with the orange/red square and sew a 1/4" seam. Set the seam and press to one side. It should now look like the picture to the right.
Lastly flip the long, narrow three piece set RST onto the larger six piece set, making sure to nest the seams neatly and sew a 1/4" seam. Set the seam and press to one side. This finishes up the third block this week!
The next few weeks are going to be twists on the theme started with our first block today. HSTs mixed with straight line blocks so we are going to get that HST down pat! Actually, looking at it, I just realized that Homeward Bound fits into the theme too because it is mostly Nine Patches too or maybe they will all be Nine Patches. We'll see. There are a bunch of Four Patches within the Nine Patches too. Once today's blocks are done, you are well prepared for the next few weeks of blocks.
Have fun and we'll see you next week!
Tara
Place one four patch/red set RST with the orange/red set and sew a 1/4" seam. Set the seam and press to one side. Place the remaining single four patch RST with one red/four patch set and sew a 1/4" seam. Set the seam and press to one side. Place the remaining red/four patch set RST with the orange/red square and sew a 1/4" seam. Set the seam and press to one side. It should now look like the picture to the right.
Lastly flip the long, narrow three piece set RST onto the larger six piece set, making sure to nest the seams neatly and sew a 1/4" seam. Set the seam and press to one side. This finishes up the third block this week!
The next few weeks are going to be twists on the theme started with our first block today. HSTs mixed with straight line blocks so we are going to get that HST down pat! Actually, looking at it, I just realized that Homeward Bound fits into the theme too because it is mostly Nine Patches too or maybe they will all be Nine Patches. We'll see. There are a bunch of Four Patches within the Nine Patches too. Once today's blocks are done, you are well prepared for the next few weeks of blocks.
Have fun and we'll see you next week!
Tara


 Cut two 3" by 3" red squares and two 3" by 3" black squares.

 Place one 1 1/2" red square RST with one 1 1/2" black square and sew a 1/4" seam. Set the seam and press toward the darker fabric. Repeat for the other seven 1 1/2" square sets. Take one red/black square set and place it RST with another red/black square set so that the opposite colours are together and the seams nest neatly and sew a 1/4" seam. Repeat for the other red/black square sets until you have four red/black four patch sets. Organize your pieces RSU the way you want them to look.


 Cut two 3" by 3" green squares and two 3" by 3" purple squares.


 Flip square 2 RST onto square 3 and sew a 1/4" seam. Set the seam and press toward square 3. Flip square 5 RST onto square 6 and sew a 1/4" seam. Set the seam and press toward square 5. Flip square 8 RST onto square 9 and sew a 1/4" seam. Set the seam and press toward square 9. Flip square 1 RST onto square 4 and sew a 1/4" seam. Set the seam and press toward square 4.


