Welcome back to our Agri-Spouse Quilt Along. I put up a post yesterday and this is the second of two big posts with most of the foundation pieced blocks. There is still an applique post and then a post with two blocks that are foundation pieced but also include "Y" seams. There is only two blocks in each of the last two posts.
Our first block this week is Block #18 - Century of Progress. I made this block with some of the fabrics wrong. I like the way my block looks but it isn't "right" and I didn't realize it until too late. The seams are all in the right place but some of the fabrics are in the wrong place. I am giving you the instructions for what I did but watch the number of each type of fabric if you want to do it the "right" way.
Cut eight 3" x 3" green squares.
Cut eight 2 1/2" x 4 1/4" blue rectangles.
Cut eight 2 1/2" x 4 1/4" pink rectangles.
Print the foundation papers.

Place a green square in the centre of each paper. Place a blue rectangle RST with a green square. Pin the three pieces together. Flip this over and sew on the stitch line. Set the seam and press open. Repeat for the other seven papers with all of the blue pieces finishing on the same side.
Repeat with the pink rectangles on the other side of the green squares.
Trim the paper triangles 1/4" from the inner stitch line.

Place two triangles RST and stitch a 1/4" seam along the long side of the triangle. Set the seam and press to one side.
This is when I removed the papers from the back.

You now have a basic four patch to put together.
Your first block for this week is put together.
Our second block for this week is Block #59 - Night and Day.
 Cut four 2" x 2 1/2" green rectangles.
Cut four 2" x 2 1/2" black rectangles.
Cut four 2" x 3 1/2" green rectangles.
Cut four 2" x 3 1/2" black rectangles.
Cut four 4" x 3 1/2" green rectangles.
Cut four 4" x 3 1/2" green rectangles.
Print the foundation papers.
Cut four 2" x 2 1/2" green rectangles.
Cut four 2" x 2 1/2" black rectangles.
Cut four 2" x 3 1/2" green rectangles.
Cut four 2" x 3 1/2" black rectangles.
Cut four 4" x 3 1/2" green rectangles.
Cut four 4" x 3 1/2" green rectangles.
Print the foundation papers.
Apparently I didn't take any pictures of the foundation piecing process for this block. Luckily, the foundation piecing for this block is just like the foundation piecing for the other blocks.
Place a 4" x 3 1/2" green rectangle right side up on the wrong side of the paper over the large triangle. Place a 2" x 3 1/2" black rectangle RST with the green square. Pin the three pieces together. Pin the three pieces together. Flip this over and sew on the stitch line. Set the seam and press open. Then place the small green rectangles RST on the black piece. Pin the three pieces together. Flip this over and sew on the stitch line. Set the seam and press open. Lastly trim the triangle 1/4" from the edge stitch line. Repeat for the other three papers with the triangles oriented the same way.
Now repeat with the other four triangle papers but with the colour of fabric in the opposite order.
Organize your pieces the way you want the to look.

Place two triangles RST and stitch a 1/4" seam along the long side of the triangle. Set the seam and press to one side.
This is when I removed the papers from the back.

You now have a basic four patch to put together.
Your first block for this week is put together.
Our third block for this week is Block #8 - Bouquet.
 Cut three 2 3/4" x 2 3/4" green squares. Cut these on the diagonal.
Cut one 2 1/2" x 2 1/2" green square.
Cut one 2 1/2" x 2 1/2" blue square.
Cut one 4" x 4" blue square. Cut this on the diagonal. You only need one triangle.
Cut two 2" x 5" green rectangles.
Cut two 2" x 4 1/2" orange rectangles.
Cut two 2" x 4 1/2" red rectangles.
Print the foundation papers.
Cut three 2 3/4" x 2 3/4" green squares. Cut these on the diagonal.
Cut one 2 1/2" x 2 1/2" green square.
Cut one 2 1/2" x 2 1/2" blue square.
Cut one 4" x 4" blue square. Cut this on the diagonal. You only need one triangle.
Cut two 2" x 5" green rectangles.
Cut two 2" x 4 1/2" orange rectangles.
Cut two 2" x 4 1/2" red rectangles.
Print the foundation papers.


Place an orange rectangle right side up on the wrong side of the trapezoid shaped paper. Place a green triangle RST with the orange rectangle. Pin the three pieces together. Flip this over and sew on the stitch line. Set the seam and press open. This can now be trimmed a 1/4" from the outside stitch line. Repeat for the other trapezoid shaped piece.
Then place a red rectangle right side up on the wrong side of the triangle shaped paper. Place a green triangle RST with the red rectangle. Pin the three pieces together. Flip this over and sew on the stitch line. Set the seam and press open. Next place another green triangle RST with the red rectangle. Pin the three pieces together. Flip this over and sew on the stitch line. Set the seam and press open. This can now be trimmed a 1/4" from the outside stitch line. Repeat for the other triangle shaped piece.
Place the 2 1/2" green square RST with the 2 1/2" blue square and make them into HSTs. One of them will be extra.
Organize the pieces the way you want them to look.

Place a trapezoid shaped piece RST with a triangle shaped piece, making sure that the seams line up. Sew a 1/4" seam, set the seam and press to one side. Repeat for the other trapezoid piece and triangle piece. This is when I removed the papers from the back.
Flip the HST RST onto the end of one of the long green rectangles. Sew a 1/4" seam, set the seam and press to one side.

Flip one of the foundation pieced pieces RST with the other foundation pieced piece. Sew a 1/4" seam, set the seam and press to one side.

Centre the long edge of the large blue triangle RST with the orange/red/green piece. Sew a 1/4" seam, set the seam and press to one side.

Place the long edge of the green rectangle RST with the larger piece. Sew a 1/4" seam, set the seam and press to one side.
Lastly place the green rectangle/HST piece RST with the larger piece. Sew a 1/4" seam, set the seam and press to one side and your block is complete!
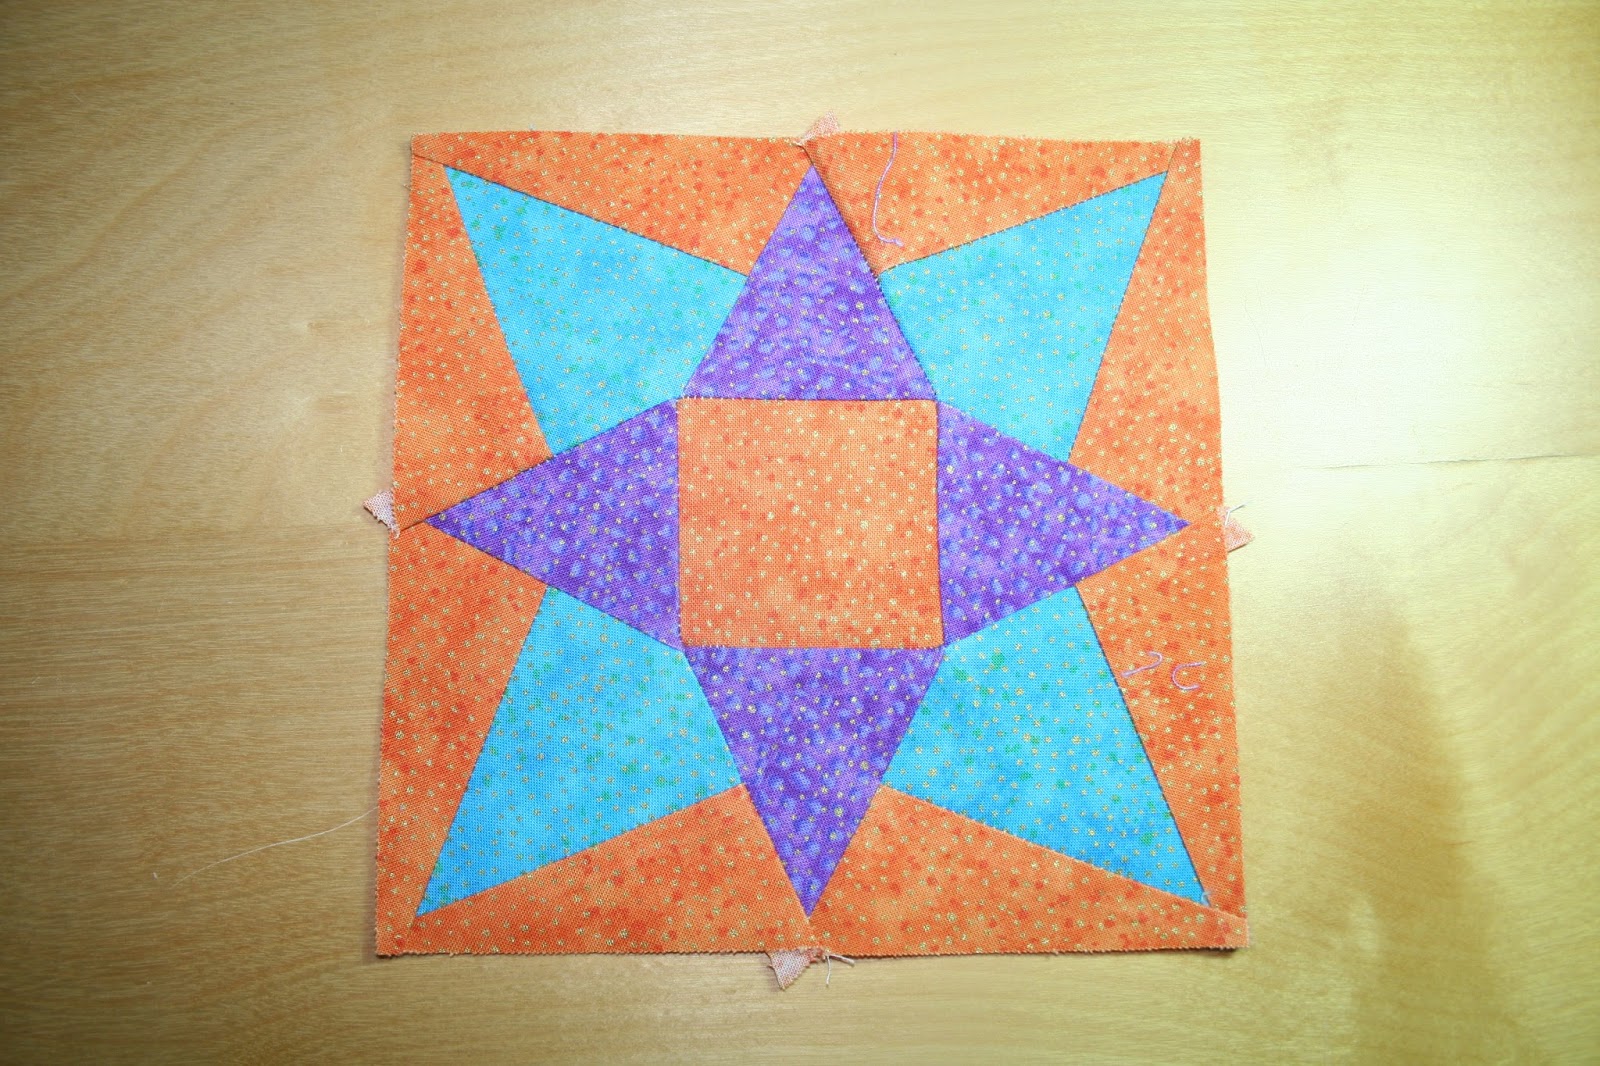
The fourth block for this week is Block #88 - Star of Hope. I did this block with foundation piecing because it was the easiest way to get the five small pieces the same size since they needed to finish at 3cm and none of my quilting rulers have centimetres on them.
 Cut one 2" x 2" pink square.
Cut four 3" x 3" pink squares. Cut these on the diagonal.
Cut four 3" x 3" purple squares. Cut these on the diagonal.
Cut one 5 1/2" x 5 1/2" pink square.
Print the foundation papers.
Cut one 2" x 2" pink square.
Cut four 3" x 3" pink squares. Cut these on the diagonal.
Cut four 3" x 3" purple squares. Cut these on the diagonal.
Cut one 5 1/2" x 5 1/2" pink square.
Print the foundation papers.
Place an pink triangle right side up on the wrong side of a foundation paper. Place a purple triangle RST with the pink triangle. Pin the three pieces together. Flip this over and sew on the stitch line. Set the seam and press open. This can now be trimmed a 1/4" from the outside stitch line. Repeat for the other trapezoid shaped piece. Repeat for the other seven foundation papers. I removed the foundation papers now.
Stitch together four of the HSTs, watching orientation. Then stitch together the other four HSTs and the small pink square, again watching the orientation of the HSTs.

Place the small strip RST with the big pink square. Sew a 1/4" seam, set the seam and press to one side.
Finally, place the large strip RST with the big pink square. Sew a 1/4" seam, set the seam and press to one side. The small pink square will be a little bit big but just trim your block to 6 1/2" x 6 1/2" and your block is complete.
Our fifth block for this week is Block #33 - Farmer's Puzzle. I did this one with foundation papers because of the measurements again.
 Cut one 1" x 6 1/2" blue rectangle.
Cut two 1" x 3 1/4" blue rectangles.
Cut eight 2 1/4" x 3 1/2" blue rectangles.
Cut eight 3" x 3" brown squares. Cut these on the diagonal.
Print the foundation papers.
Cut one 1" x 6 1/2" blue rectangle.
Cut two 1" x 3 1/4" blue rectangles.
Cut eight 2 1/4" x 3 1/2" blue rectangles.
Cut eight 3" x 3" brown squares. Cut these on the diagonal.
Print the foundation papers.
 Place a blue rectangle right side up on the wrong side of a foundation paper. Place a brown triangle RST with the blue rectangle. Pin the three pieces together. Flip this over and sew on the stitch line. Set the seam and press open. Next place another brown triangle RST with the blue rectangle. Pin the three pieces together. Flip this over and sew on the stitch line. Set the seam and press open. This can now be trimmed a 1/4" from the outside stitch line. Repeat for the other seven blue rectangle pieces.

Organize your pieces the way you want them to look.
Place one pieced rectangle RST with another. Sew a 1/4" seam, set the seam and press to one side. Repeat with the other three rectangle pairs.

Watching orientation, place one pieced square RST with a blue rectangle. Sew a 1/4" seam, set the seam and press to one side. Place another pieced square on the other side of the blue rectangle. Sew a 1/4" seam, set the seam and press to one side. Repeat with the other two pieced squares and the remaining small blue rectangle.
Watching orientation, place one pieced rectangle RST with the large blue rectangle. Sew a 1/4" seam, set the seam and press to one side. Place the other pieced rectangle on the other side of the blue rectangle. Sew a 1/4" seam, set the seam and press to one side. Trim your block to 6 1/2" x 6 1/2" and your block is complete.
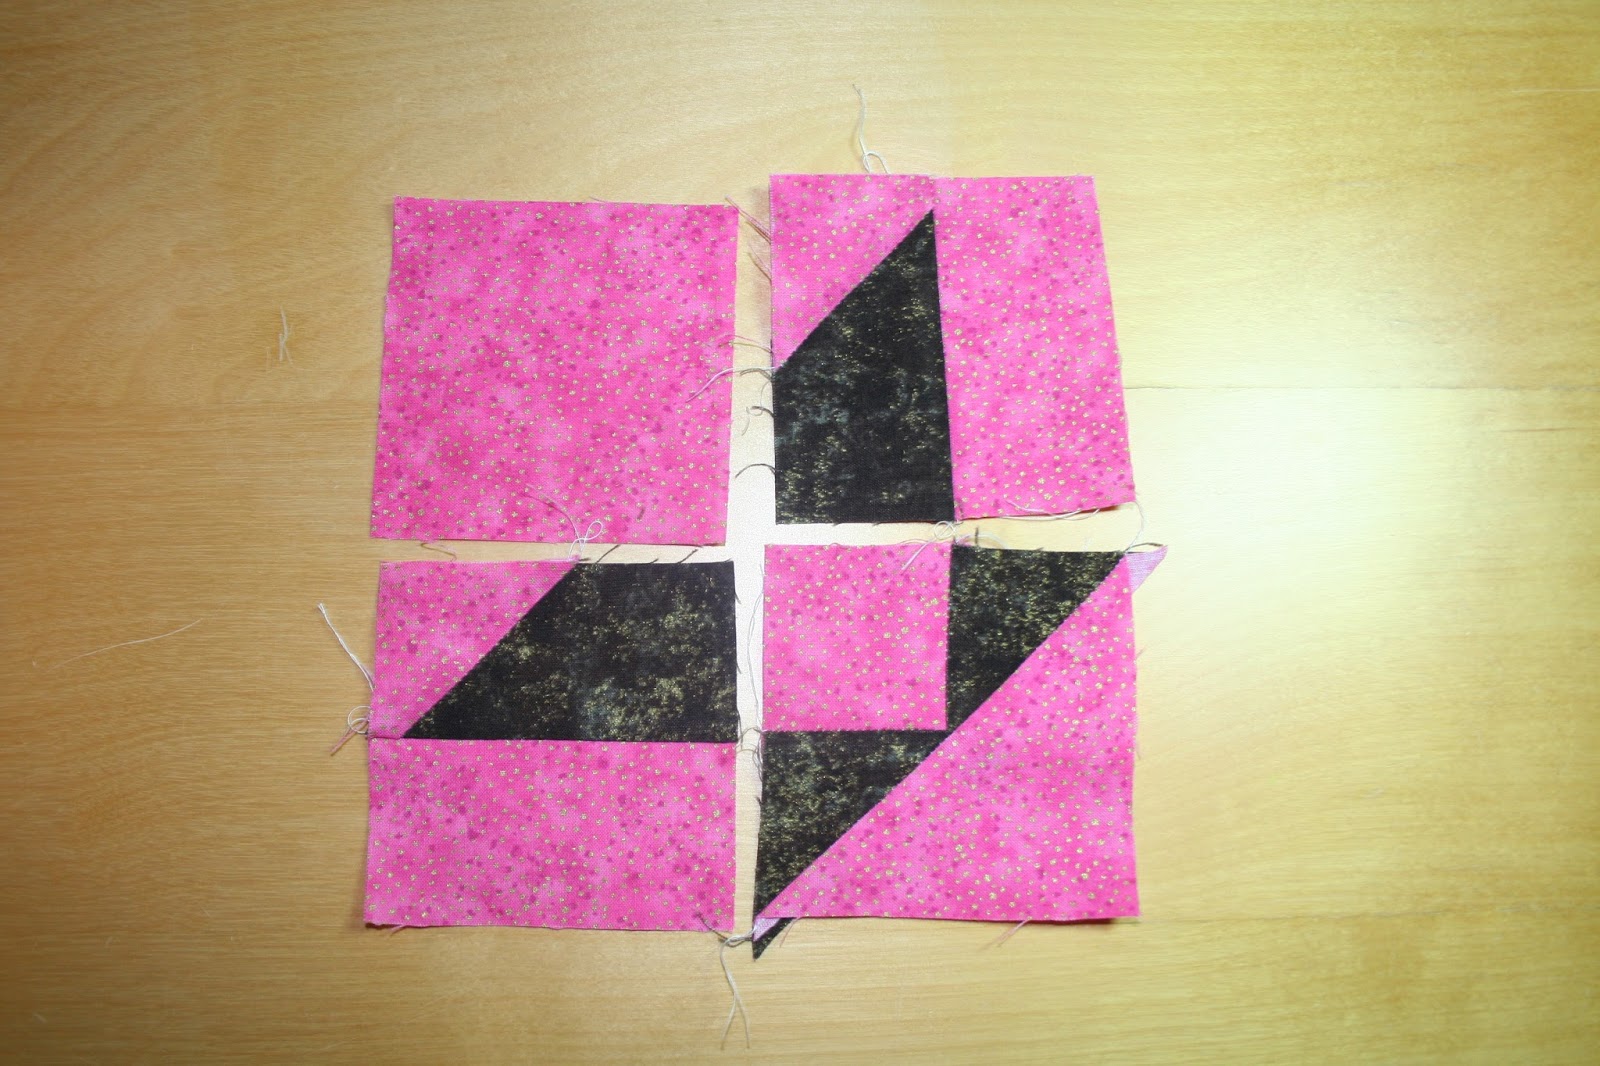
Our sixth block this week is Block #78 - Shooting Star.
 Cut four 2" x 4" black rectangles.
Cut four 1 1/2" x 3" black rectangles.
Cut two 3" x 3" light pink squares.
Cut two 4" x 5" light pink rectangles. Cut these on the diagonal in opposite directions.
Cut two 2" x 2" dark pink squares. Cut these on the diagonal.
Cut two 3" x 4" dark pink rectangles. Cut these on the diagonal in opposite directions.
Cut two 3 1/4" x 4 1/4" dark pink rectangles. Cut these on the diagonal in opposite directions.
Print the foundation papers.
Cut four 2" x 4" black rectangles.
Cut four 1 1/2" x 3" black rectangles.
Cut two 3" x 3" light pink squares.
Cut two 4" x 5" light pink rectangles. Cut these on the diagonal in opposite directions.
Cut two 2" x 2" dark pink squares. Cut these on the diagonal.
Cut two 3" x 4" dark pink rectangles. Cut these on the diagonal in opposite directions.
Cut two 3 1/4" x 4 1/4" dark pink rectangles. Cut these on the diagonal in opposite directions.
Print the foundation papers.

Place a pink square right side up on the wrong side of the large paper. Place a large dark pink triangle RST with the pink square. Pin the three pieces together. Flip this over and sew on the stitch line. Set the seam and press open. Next place another large pink triangle RST on the other side of the pink square. Pin the three pieces together. Flip this over and sew on the stitch line. Set the seam and press open. Repeat for the other large foundation paper.

Place a 1 1/2" x 3" black rectangle right side together on the dark pink fabric. Pin the three pieces together. Flip this over and sew on the stitch line. Set the seam and press open. Next place another 1 1/2" x 3" black rectangle right side together on the dark pink fabric. Pin the three pieces together. Flip this over and sew on the stitch line. Set the seam and press open. Repeat for the other large foundation paper.
Place a large light pink triangle right side together on the dark pink fabric. Pin the three pieces together. Flip this over and sew on the stitch line. Set the seam and press open. Next place another large pink triangle right side together on the dark pink fabric. Pin the three pieces together. Flip this over and sew on the stitch line. Set the seam and press open. Repeat for the other large foundation paper. These rectangles can now be trimmed 1/4" from the outer stitch line.

Place a 2" x 4" black rectangle right side up on the wrong side of the small paper. Place a small dark pink triangle RST with the black rectanlge. Pin the three pieces together. Flip this over and sew on the stitch line. Set the seam and press open. Next place the large dark pink triangle RST on the other side of the black rectangle. Pin the three pieces together. Flip this over and sew on the stitch line. Set the seam and press open. Repeat for the other three small foundation paper. These rectangles can now be trimmed 1/4" from the outer stitch line.

Organize your pieces the way you want them to look.
 Place two of the small rectangles RST. Sew a 1/4" seam, set the seam and press to one side.
Place one narrow rectangle RST with a large rectangle. Sew a 1/4" seam, set the seam and press to one side. Repeat with the other small rectangle and large rectangle. This is when I removed the papers from the back.
Lastly place the two large pieces RST. Sew a 1/4" seam, set the seam and press to one side and the block is complete.
Our seventh block this week is Block #82 - Spider Legs. I tried to be frugal with my fabric when I made this block and ended up spending way too much time getting everything to fit. The measurements I gave here are the measurements that I cut for the next block which is extremely similar and it was so much easier. I wasted a bit more fabric but the block was done in so much less time.
 Cut one 1 7/8" x 1 7/8" yellow square.
Cut four 2" x 2" yellow squares. Cut these on the diagonal.
Cut eight 1 1/2" x 2 1/2" yellow rectangles.
Cut two 4 1/8" x 4 1/8" purple squares. Cut these on the diagonal.
Cut eight 1 1/2" x 2 1/2" purple rectangles.
Cut eight 1 1/2" x 3 1/2" purple rectangles.
Print the foundation papers.
Cut one 1 7/8" x 1 7/8" yellow square.
Cut four 2" x 2" yellow squares. Cut these on the diagonal.
Cut eight 1 1/2" x 2 1/2" yellow rectangles.
Cut two 4 1/8" x 4 1/8" purple squares. Cut these on the diagonal.
Cut eight 1 1/2" x 2 1/2" purple rectangles.
Cut eight 1 1/2" x 3 1/2" purple rectangles.
Print the foundation papers.

Place a 1 1/2" x 3 1/2" purple rectangle right side up on the wrong side of a foundation paper. Place a yellow rectangle RST with the purple rectangle. Pin the three pieces together. Flip this over and sew on the stitch line. Set the seam and press open. Repeat for the other seven foundation papers.

Place a 1 1/2" x 2 1/2" purple rectangle RST with the yellow rectangle. Pin the three pieces together. Flip this over and sew on the stitch line. Set the seam and press open. Repeat for the other seven foundation papers.

Place a yellow triangle RST with the purple rectangle. Pin the three pieces together. Flip this over and sew on the stitch line. Set the seam and press open. Repeat for the other seven foundation papers.

Trim your foundation pieces 1/4" from the outside stitch line. Organize your pieces the way you want them to look.

You now have a diagonal nine patch to put together like all the other nine patches you have put together.
Trim your block to 6 1/2" x 6 1/2" square and your block is finished.
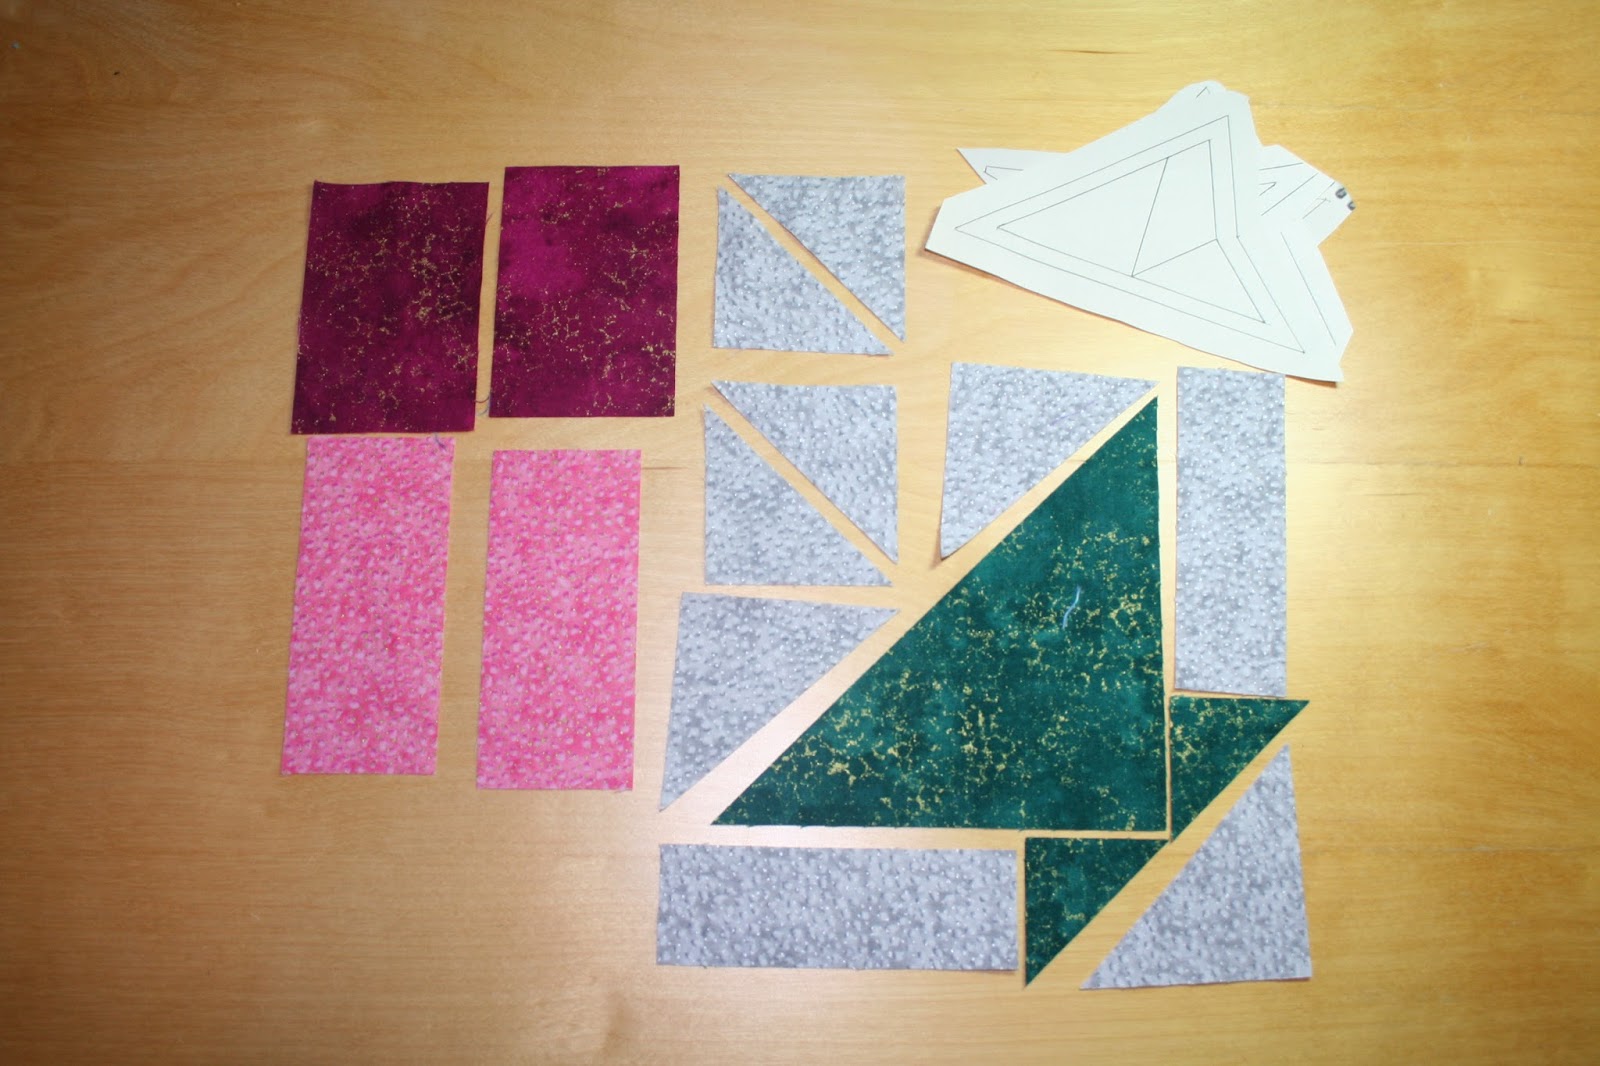
Our last block this week is Block #110 - Wood Lily.This block is very similar to the last block, just more pieces. In fact, from the reading I did while looking for instructions on how to do the blocks we did with foundation piecing, without foundation piecing, Wood Lily has the most pieces of any other block in the whole quilt! I found that interesting.
 Cut one 1 7/8" x 1 7/8" dark blue square.
Cut two 3 1/4" x 3 1/4" dark blue squares.
Cut two 3 1/4" x 3 1/4" grey squares.
Cut four 2 3/8" x 2 3/8" grey squares. Cut these on the diagonal.
Cut four 2 1/4" x 2 1/4" grey squares. Cut these on the diagonal.
Cut eight 1" x 2 1/2" dark blue rectangles.
Cut sixteen 1" x 2 1/2" light blue rectangles.
Cut four 1 7/8" x 1 7/8" dark blue squares. Cut these on the diagonal.
Print the foundation papers.
Cut one 1 7/8" x 1 7/8" dark blue square.
Cut two 3 1/4" x 3 1/4" dark blue squares.
Cut two 3 1/4" x 3 1/4" grey squares.
Cut four 2 3/8" x 2 3/8" grey squares. Cut these on the diagonal.
Cut four 2 1/4" x 2 1/4" grey squares. Cut these on the diagonal.
Cut eight 1" x 2 1/2" dark blue rectangles.
Cut sixteen 1" x 2 1/2" light blue rectangles.
Cut four 1 7/8" x 1 7/8" dark blue squares. Cut these on the diagonal.
Print the foundation papers.

Place one 3 1/4" dark blue square RST with a 3 1/4" grey square. Make them into HSTs. Trim the HSTs to 2" x 2". Repeat for the other 3 1/4" dark blue/grey square pair.
Place a dark blue triangle right side up on the wrong side of a foundation paper. Place a light blue rectangle RST with the dark blue triangle. Pin the three pieces together. Flip this over and sew on the stitch line. Set the seam and press open. Repeat for the other seven foundation papers. Next place a dark blue rectangle RST with the light blue rectangle. Pin the pieces together. Flip this over and sew on the stitch line. Set the seam and press open.
Place the short side of a grey triangle RST with an HST so that the right angles match up. Sew a 1/4" seam, set the seam and press to one side. Repeat for the other three HSTs.
Next place a light blue rectangle RST with the dark blue rectangle. Pin the pieces together. Flip this over and sew on the stitch line. Set the seam and press open. Repeat for the other seven foundation papers.

Place the short side of another grey triangle RST with the HST set so that the right angles match up. Sew a 1/4" seam, set the seam and press to one side. Repeat for the other three HSTs.
Next place a grey triangle RST with the light blue rectangle. Pin the pieces together. Flip this over and sew on the stitch line. Set the seam and press open. Repeat for the other seven foundation papers. Trim the foundation pieces 1/4" from the outer stitch line.

Place two of the foundation pieced pieces RST. Sew a 1/4" seam, set the seam and press to one side. Repeat for the other three foundation pieced pairs.
You now have a diagonal nine patch to put together like all the other nine patches you have put together.
I forgot to take a picture once I trimmed this block but trim the block to 6 1/2" x 6 1/2". Your last block is finished for this week and this is also the end of the "simple" foundation pieced blocks.
There are two foundation pieced blocks left to go but they are the two blocks that have "Y" seams and those will be the last two blocks we put together.
Next week - Applique!
Have fun.
Tara.
 Cut two 1 1/2" x 4 1/2" grey rectangles.


 Cut four 4" x 3" blue rectangles.